@maplibre/maplibre-gl-directions - v0.9.1
MapLibreGlDirections
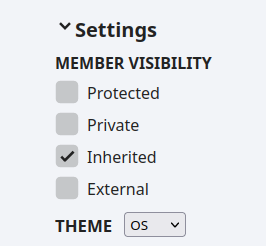
For the sakes of your convenience, make sure you've enabled the "Inherited" filter only:
Basic Usage
Start by importing the plugin. Then, when the map is loaded, create an instance of the imported {@link default|MapLibreGlDirections} class passing to the constructor a map instance and optionally a {@link MapLibreGlDirectionsConfiguration|configuration object}.
import MapLibreGlDirections from "@maplibre/maplibre-gl-directions";
map.on("load", () => {
const directions = new MapLibreGlDirections(map, {
// optional configuration
});
});
If needed, enable the interactivity.
directions.interactive = true;
Use the plugin's public interface to set, add and remove waypoints.
// Set the waypoints programmatically
directions.setWaypoints([
[-73.8271025, 40.8032906],
[-73.8671258, 40.82234996],
]);
// Remove the first waypoint
directions.removeWaypoint(0);
// Add a waypoint at index 0
directions.addWaypoint([-73.8671258, 40.82234996], 0);
Listen to the plugin's events.
directions.on("movewaypoint", () => {
console.log("A waypoint has been moved!");
});
Call the {@link clear|clear} method to remove all the plugin's traces from the map.
directions.clear();
If you need to completely disable the plugin, make sure to call the {@link destroy|destroy} method first.
directions.destroy();
directions = undefined;
Controls
LoadingIndicatorControl
The {@link LoadingIndicatorControl} adds a spinning wheel that appears whenever there's an ongoing routing requests and automatically disappears as soon as the request is finished.
The loading indicator's appearance is configurable via the {@link LoadingIndicatorControlConfiguration} object that is (optionally) passed as the second argument to the constructor.
See the respective {@link https://maplibre.org/maplibre-gl-directions/#/examples/loading-indicator-control|Demo}.
BearingsControl
The {@link BearingsControl} is a built-in control for manipulating waypoints' bearings values when the respective bearings option is set to true for a given Directions instance.
The loading indicator's appearance and behavior are configurable via the {@link BearingsControlConfiguration} object that is (optionally) passed as the second argument to the constructor.
See the respective {@link https://maplibre.org/maplibre-gl-directions/#/examples/bearings-support-and-control|Demo}.
Here's the list of CSS classes available for the end user to style the component according to one's needs:
maplibre-gl-directions-bearings-controlmaplibre-gl-directions-bearings-control__listmaplibre-gl-directions-bearings-control__list-itemmaplibre-gl-directions-bearings-control__list-item--enabledmaplibre-gl-directions-bearings-control__list-item--disabled
maplibre-gl-directions-bearings-control__numbermaplibre-gl-directions-bearings-control__checkboxmaplibre-gl-directions-bearings-control__waypoint-imagemaplibre-gl-directions-bearings-control__inputmaplibre-gl-directions-bearings-control__text
DirectionsControl
WIP (1.x milestone).
Customization
For the sakes of your convenience, make sure you've enabled the "Inherited/Protected/External" filter:

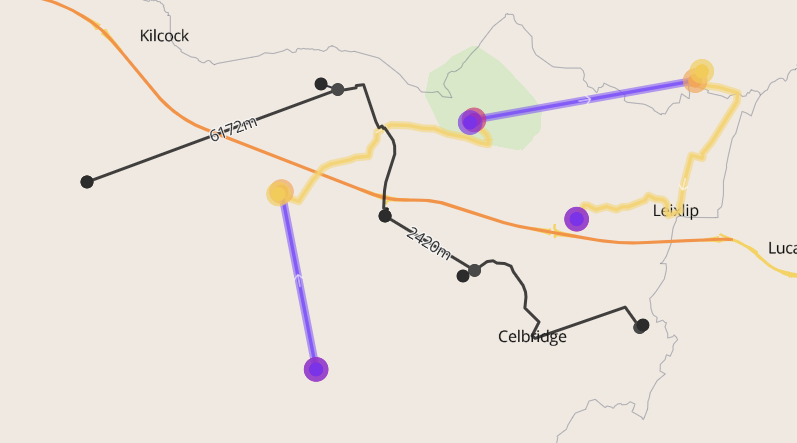
Here's an example of what can potentially be done after investing some time into customization: straight-lined routing, distance measurement, multiple Directions' instances running in parallel on the same map with a possibility to toggle between them, different types of Waypoints and Snappoints and so on:
In short, all the plugin's customization possibilities fall down into 2 categories: visual-only customization and behavioral customization.
Visual-only customization
Visual-only customization is done by modifying the style layers used by the plugin. You can either remove certain layers altogether, or instead add additional custom ones, or modify existing layers, or refuse from using or modifying the existing layers and instead define new layers from scratch. Or you can combine these different approaches to achieve the look-and-feel you aim towards.
When you create an instance of Directions, you're allowed to provide the constructor with the {@link MapLibreGlDirectionsConfiguration|configuration object}. One of the configuration options is the {@link layers|layers} array.
By default (if you don't provide this configuration option), the plugin uses the default layers that are generated by the {@link layersFactory|layersFactory} function. But you can instead provide a plain array of {@link LayerSpecification} objects. See the {@link https://maplibre.org/maplibre-gl-directions/#/examples/restyling|Restyling} example for a demo.
When re-defining the layers, you must respect the following rules:
- There must be at least one layer for Waypoints
- There must be at least one layer for Snappoints
- There must be at least one layer for the Hoverpoint
- There must be at least one layer for Routelines
- There must be at least one layer for Alternative Routelines (if you plan to enable the respective request option)
If you think you don't need some of these layers, you must still provide them, but use some styling that would allow to actually hide the features represented by the layer. For instance, using the {@link https://maplibre.org/maplibre-gl-js-docs/style-spec/layers/#layout-background-visibility|`visibility`} property.
Waypoints, Snappoints and the Hoverpoint represent (obviously enough) Point GeoJSON Features. So you would most probably like to use either "symbol" or "circle" layer types for those.
Routelines and Alternative Routelines represent GeoJSON LineString Features and therefore must be represented with layers of type "line".
You can also optionally provide one or more layers for the snaplines (the lines that connect Waypoints to their related snappoints and the Hoverpoint to its related Waypoints).
To filter out the features that are only applicable for the given layers, you can use the following filters:
- For Snaplines:
["==", ["get", "type"], "SNAPLINE"](meaning: all the features wherefeature.properties.type === "SNAPLINE") - For Alternative Routelines:
["==", ["get", "route"], "ALT"](meaning: all the features wherefeature.properties.route === "ALT") - For Routelines (i.e. the selected Routeline):
["==", ["get", "route"], "SELECTED"](meaning: all the features wherefeature.properties.route === "SELECTED") - For the Hoverpoint:
["==", ["get", "type"], "HOVERPOINT"](meaning: all the features wherefeature.properties.type === "HOVERPOINT") - For Snappoints:
["==", ["get", "type"], "SNAPPOINT"](meaning: all the features wherefeature.properties.type === "SNAPPOINT") - For Waypoints:
["==", ["get", "type"], "WAYPOINT"](meaning: all the features wherefeature.properties.type === "WAYPOINT")
Note that the order the layers appear in the array determines the order the features will appear on the map. You are free to use any order that applies better for your exact case, but by default the layers come in the order they're listed above: the Waypoints' layers are the foremost ones.
Here's the example of the layers re-definition for the {@link https://maplibre.org/maplibre-gl-directions/#/examples/restyling|Restyling} example:
layers: [
{
id: "maplibre-gl-directions-snapline",
type: "line",
source: "maplibre-gl-directions",
layout: {
"line-cap": "round",
"line-join": "round",
},
paint: {
"line-dasharray": [2, 2],
"line-color": "#ffffff",
"line-opacity": 0.65,
"line-width": 2,
},
filter: ["==", ["get", "type"], "SNAPLINE"],
},
{
id: "maplibre-gl-directions-alt-routeline",
type: "line",
source: "maplibre-gl-directions",
layout: {
"line-cap": "butt",
"line-join": "round",
},
paint: {
"line-pattern": "routeline",
"line-width": 8,
"line-opacity": 0.5,
},
filter: ["==", ["get", "route"], "ALT"],
},
{
id: "maplibre-gl-directions-routeline",
type: "line",
source: "maplibre-gl-directions",
layout: {
"line-cap": "butt",
"line-join": "round",
},
paint: {
"line-pattern": "routeline",
"line-width": 8,
},
filter: ["==", ["get", "route"], "SELECTED"],
},
{
id: "maplibre-gl-directions-hoverpoint",
type: "symbol",
source: "maplibre-gl-directions",
layout: {
"icon-image": "balloon-hoverpoint",
"icon-anchor": "bottom",
"icon-ignore-placement": true,
"icon-overlap": "always",
},
filter: ["==", ["get", "type"], "HOVERPOINT"],
},
{
id: "maplibre-gl-directions-snappoint",
type: "symbol",
source: "maplibre-gl-directions",
layout: {
"icon-image": "balloon-snappoint",
"icon-anchor": "bottom",
"icon-ignore-placement": true,
"icon-overlap": "always",
},
filter: ["==", ["get", "type"], "SNAPPOINT"],
},
{
id: "maplibre-gl-directions-waypoint",
type: "symbol",
source: "maplibre-gl-directions",
layout: {
"icon-image": "balloon-waypoint",
"icon-anchor": "bottom",
"icon-ignore-placement": true,
"icon-overlap": "always",
},
filter: ["==", ["get", "type"], "WAYPOINT"],
},
];
As you can see, each layer type is represented by one layer: one for Snaplines, one for the Hoverpoint and so on. But you're not restricted to one layer-per-feature. Each feature could easily be represented by multiple layers. By the way, that's exactly the way the things are implemented by default. E.g. each Waypoint is by default represented by 2 layers: one for the casing ("halo", as the MapLibre spec calls it) and one for the main, central circle.
By default, the plugin expects you to provide casings for Waypoints, Snappoints, Hoverpoint, and all the Routelines. The thing here is that all these features are made interactive (except for the Hoverpoint's casing) because the user would probably like to be able not to aim exactly at the very center of a Waypoint to be able to move it, but also to be able to drag the Waypoint by it casing. Here comes the concept of sensitive layers.
If you decide to deviate from the default model where there are 2 layers for Waypoints, 2 layers for Snappoints, 2 layers for Routelines and 2 layers for Alternative Routelines, you must manually specify which layers should be considered sensitive for each group of these features. Please, see the {@link https://maplibre.org/maplibre-gl-directions/#/examples/restyling|Restyling} example for details. Namely, take a look at the source code for the example.
Originally, the definitions of the sensitive layers look like these:
sensitiveWaypointLayers: ["maplibre-gl-directions-waypoint", "maplibre-gl-directions-waypoint-casing"]sensitiveSnappointLayers: ["maplibre-gl-directions-snappoint", "maplibre-gl-directions-snappoint-casing"]sensitiveRoutelineLayers: ["maplibre-gl-directions-routeline", "maplibre-gl-directions-routeline-casing"]sensitiveAltRoutelineLayers: ["maplibre-gl-directions-alt-routeline", "maplibre-gl-directions-alt-routeline-casing"]
If you, e.g., decide to use the only "my-waypoint" layer to represent all the Waypoints, you must update the sensitiveWaypointLayers option's value respectfully: sensitiveWaypointLayers: ["my-waypoint"].
Also, don't forget to make sure that all the custom icons and images you use for your custom layers are loaded and added to the map before you create an instance of Directions.
Another example of your interest might be the {@link https://maplibre.org/maplibre-gl-directions/#/examples/show-routes'-directions|Show Routes' Directions} one. It shows how to add an additional "symbol" layer to show arrows that represent the route's direction.
Behavioral customization
Behavioral customization allows you (jokes aside) to customize the plugin's behavior. It might be some minor customization (like saving some additional information for each waypoint in order to be able to somehow manipulate that saved data later) or some more complex cases like allowing for different types of waypoints - routed and straight-lined waypoints, though we won't cover the last case in this guide at least because it requires some severe updates on the back-end-side.
Behavioral customization in its main comes down to 2 different strategies. In order to pick the most appropriate one, ask yourself a question: does the plugin's public interface provide enough data to satisfy my case?
If the answer is "yes", then in most cases all you'd need is to listen to events and react to them appropriately. But if you need some additional data that comes from the server, or some intrinsic plugin's properties, you'd need to extend the {@link default|MapLibreGlDirections} superclass with a subclass:
import MapLibreGlDirections from "@maplibre/maplibre-gl-directions";
class MyCustomDirections extends MapLibreGlDirections {
constructor(map: maplibregl.Map, configuration?: Partial<MapLibreGlDirectionsConfiguration>) {
super(map, configuration);
}
}
Then, instead of creating an instance of the {@link default} class, you create an instance of your custom class:
const directions = new MyCustomDirections(map, {
requestOptions: {
alternatives: "true",
},
});
In that subclass you're free to augment the default implementation the way you need, to remove methods and properties, to create your own custom ones, to modify and extend the built-in standard ones and more.
There are 2 examples available at the moment that cover the subclass-extensibility case. The fist one is the {@link https://maplibre.org/maplibre-gl-directions/#/examples/distance-measurement|Distance Measurement}. It shows how to extend the {@link default} superclass with a subclass in a way so that the instance produced by the last would allow you to display each route leg's distance along the respective routeline. It also uses the {@link removewaypoint|removewaypoint} and {@link fetchroutesend|fetchroutesend} events to read the response's total distance field to be able to display it in the UI.
The second example is called {@link https://maplibre.org/maplibre-gl-directions/#/examples/load-and-save|Load and Save}. It considers the case when you need to be able to load and save the (pre)built route as a collection of GeoJSON Features.
The only thing that you should be aware of when trying to extend the plugin's default functionality with a subclass is that there exist two different approaches of extending the default methods.
The thing here is that some methods of the main class are defined on it as usual normal methods, and some other being not exactly methods in common sense, but rather properties which hold functions in them.
There's (almost) no difference from the architectual-design perspective, but the language still implies some restrictions over semantics for extensibility.
Namely, normally you're allowed to re-define some existing method of a superclass like this if your goal is to also make use of the super method's functionality:
existingSuperMethod() {
const originalResult = super.existingSuperMethod();
// ... do other stuff with the result
}
But in cases with e.g. utility-methods of the plugin that becomes impossible, and what you need to do instead is to first save the original implementation somewhere (let's say as a class field) and then to manually call it where appropriate as if it was a super-call:
// where the `utils` comes from the `import { utils } from "@maplibre/maplibre-gl-directions"`
originalBuildRoutelines = utils.buildRoutelines;
protected buildRoutelines = (
requestOptions: MapLibreGlDirectionsConfiguration["requestOptions"],
routes: Route[],
selectedRouteIndex: number,
snappoints: Feature<Point>[],
): Feature<LineString>[][] => {
// first we call the original method. It returns the built routelines
const routelines = this.originalBuildRoutelines(requestOptions, routes, selectedRouteIndex, snappoints);
// modify these routelines the way you need
// ...
// and don't forget to return the resulting modified routelines
return routelines;
}
See the examples' source codes to dive deeper into the implementation details. There are a lot of possibilities, and it's a really tricky business to describe each possible detail here in the docs. Feel free to experiment and ask a question either in the MapLibre's official channel in Slack or even open an issue (or a new discussion) in the plugin's GitHub repo.