Introduction
![]()
Martin is a tile server able to generate and serve vector tiles on the fly from large PostGIS databases, PMTiles (local or remote), and MBTiles files, allowing multiple tile sources to be dynamically combined into one. Martin optimizes for speed and heavy traffic, and is written in Rust.
See also Martin demo site
![]()

![]()
![]()

Quick Start
Martin Quick Start Guide
Choose your operating system to get started with Martin tile server
On Linux
Quick start on Linux
mkdir martin
cd martin

# Download some sample data
curl -L -O https://github.com/maplibre/martin/raw/main/tests/fixtures/mbtiles/world_cities.sql

# Check if sqlite is installed
sqlite3 --version

# Initialize a database
sqlite3 world_cities.mbtiles < world_cities.sql

# Download the latest version of Martin binary, extract it, and make it executable
curl -L -O https://github.com/maplibre/martin/releases/latest/download/martin-x86_64-unknown-linux-gnu.tar.gz
tar -xzf martin-x86_64-unknown-linux-gnu.tar.gz
chmod +x ./martin

# Show Martin help screen
./martin --help

# Run Martin with the sample data as the only tile source
./martin world_cities.mbtiles
View the map
See quick start with QGIS for instructions on how to view the map.
On macOS
Quick start on macOS
-
Download some demo tiles.
-
Download the latest version of Martin from the release page. Use about this Mac to find your processors type.
- Use martin-x86_64-apple-darwin.tar.gz for Intel
- Use martin-aarch64-apple-darwin.tar.gz for M1
-
Extract content of both files and place them in a same directory.
-
Open the command prompt and navigate to the directory where
martinandworld_cities.sqlare located. -
Run the following command to start Martin with the demo data:
# Initialize a database
sqlite3 world_cities.mbtiles < world_cities.sql

# Show Martin help screen
./martin --help

# Run Martin with the sample data as the only tile source
./martin world_cities.mbtiles
View the map
See quick start with QGIS for instructions on how to view the map.
On Windows
Quick start on Windows
-
Download some demo tiles.
-
Download the latest Windows version of Martin from the release page: martin-x86_64-pc-windows-msvc.zip
-
Extract content of both files and place them in a same directory.
-
Open the command prompt and navigate to the directory where
martinandworld_cities.sqlare located. -
Run the following command to start Martin with the demo data:
# Check if sqlite is installed
sqlite3 --version

# Initialize a database
sqlite3 world_cities.mbtiles < world_cities.sql

# Show Martin help screen
martin --help

# Run Martin with the sample data as the only tile source
martin world_cities.mbtiles
View the map
See quick start with QGIS for instructions on how to view the map.
View with QGIS
View map with QGIS
-
Download, install, and run QGIS for your platform
-
Add a new
Vector Tilesconnection
-
In the
Vector Tile Connectiondialog, give it some name and the URL of the Martin server, e.g.http://localhost:3000/world_cities/{z}/{x}/{y}and clickOK.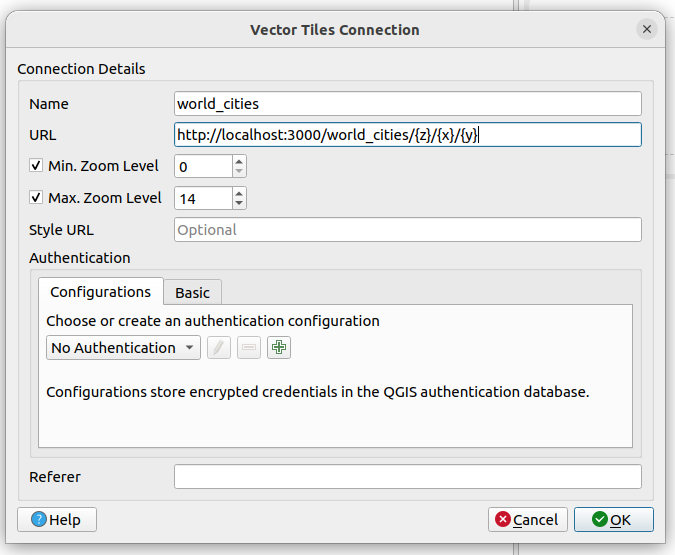
-
In the QGIS browser panel (left), double-click the newly added connection, or right-click it and click on
Add Layer to Project.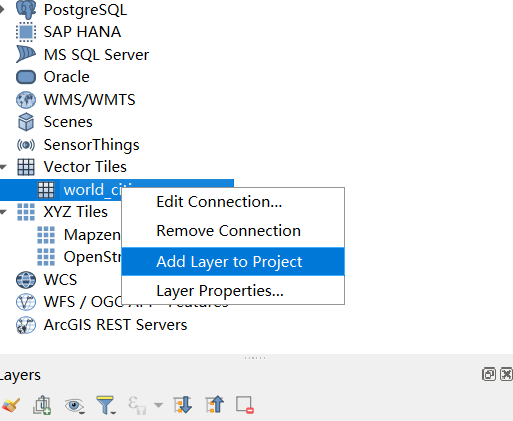
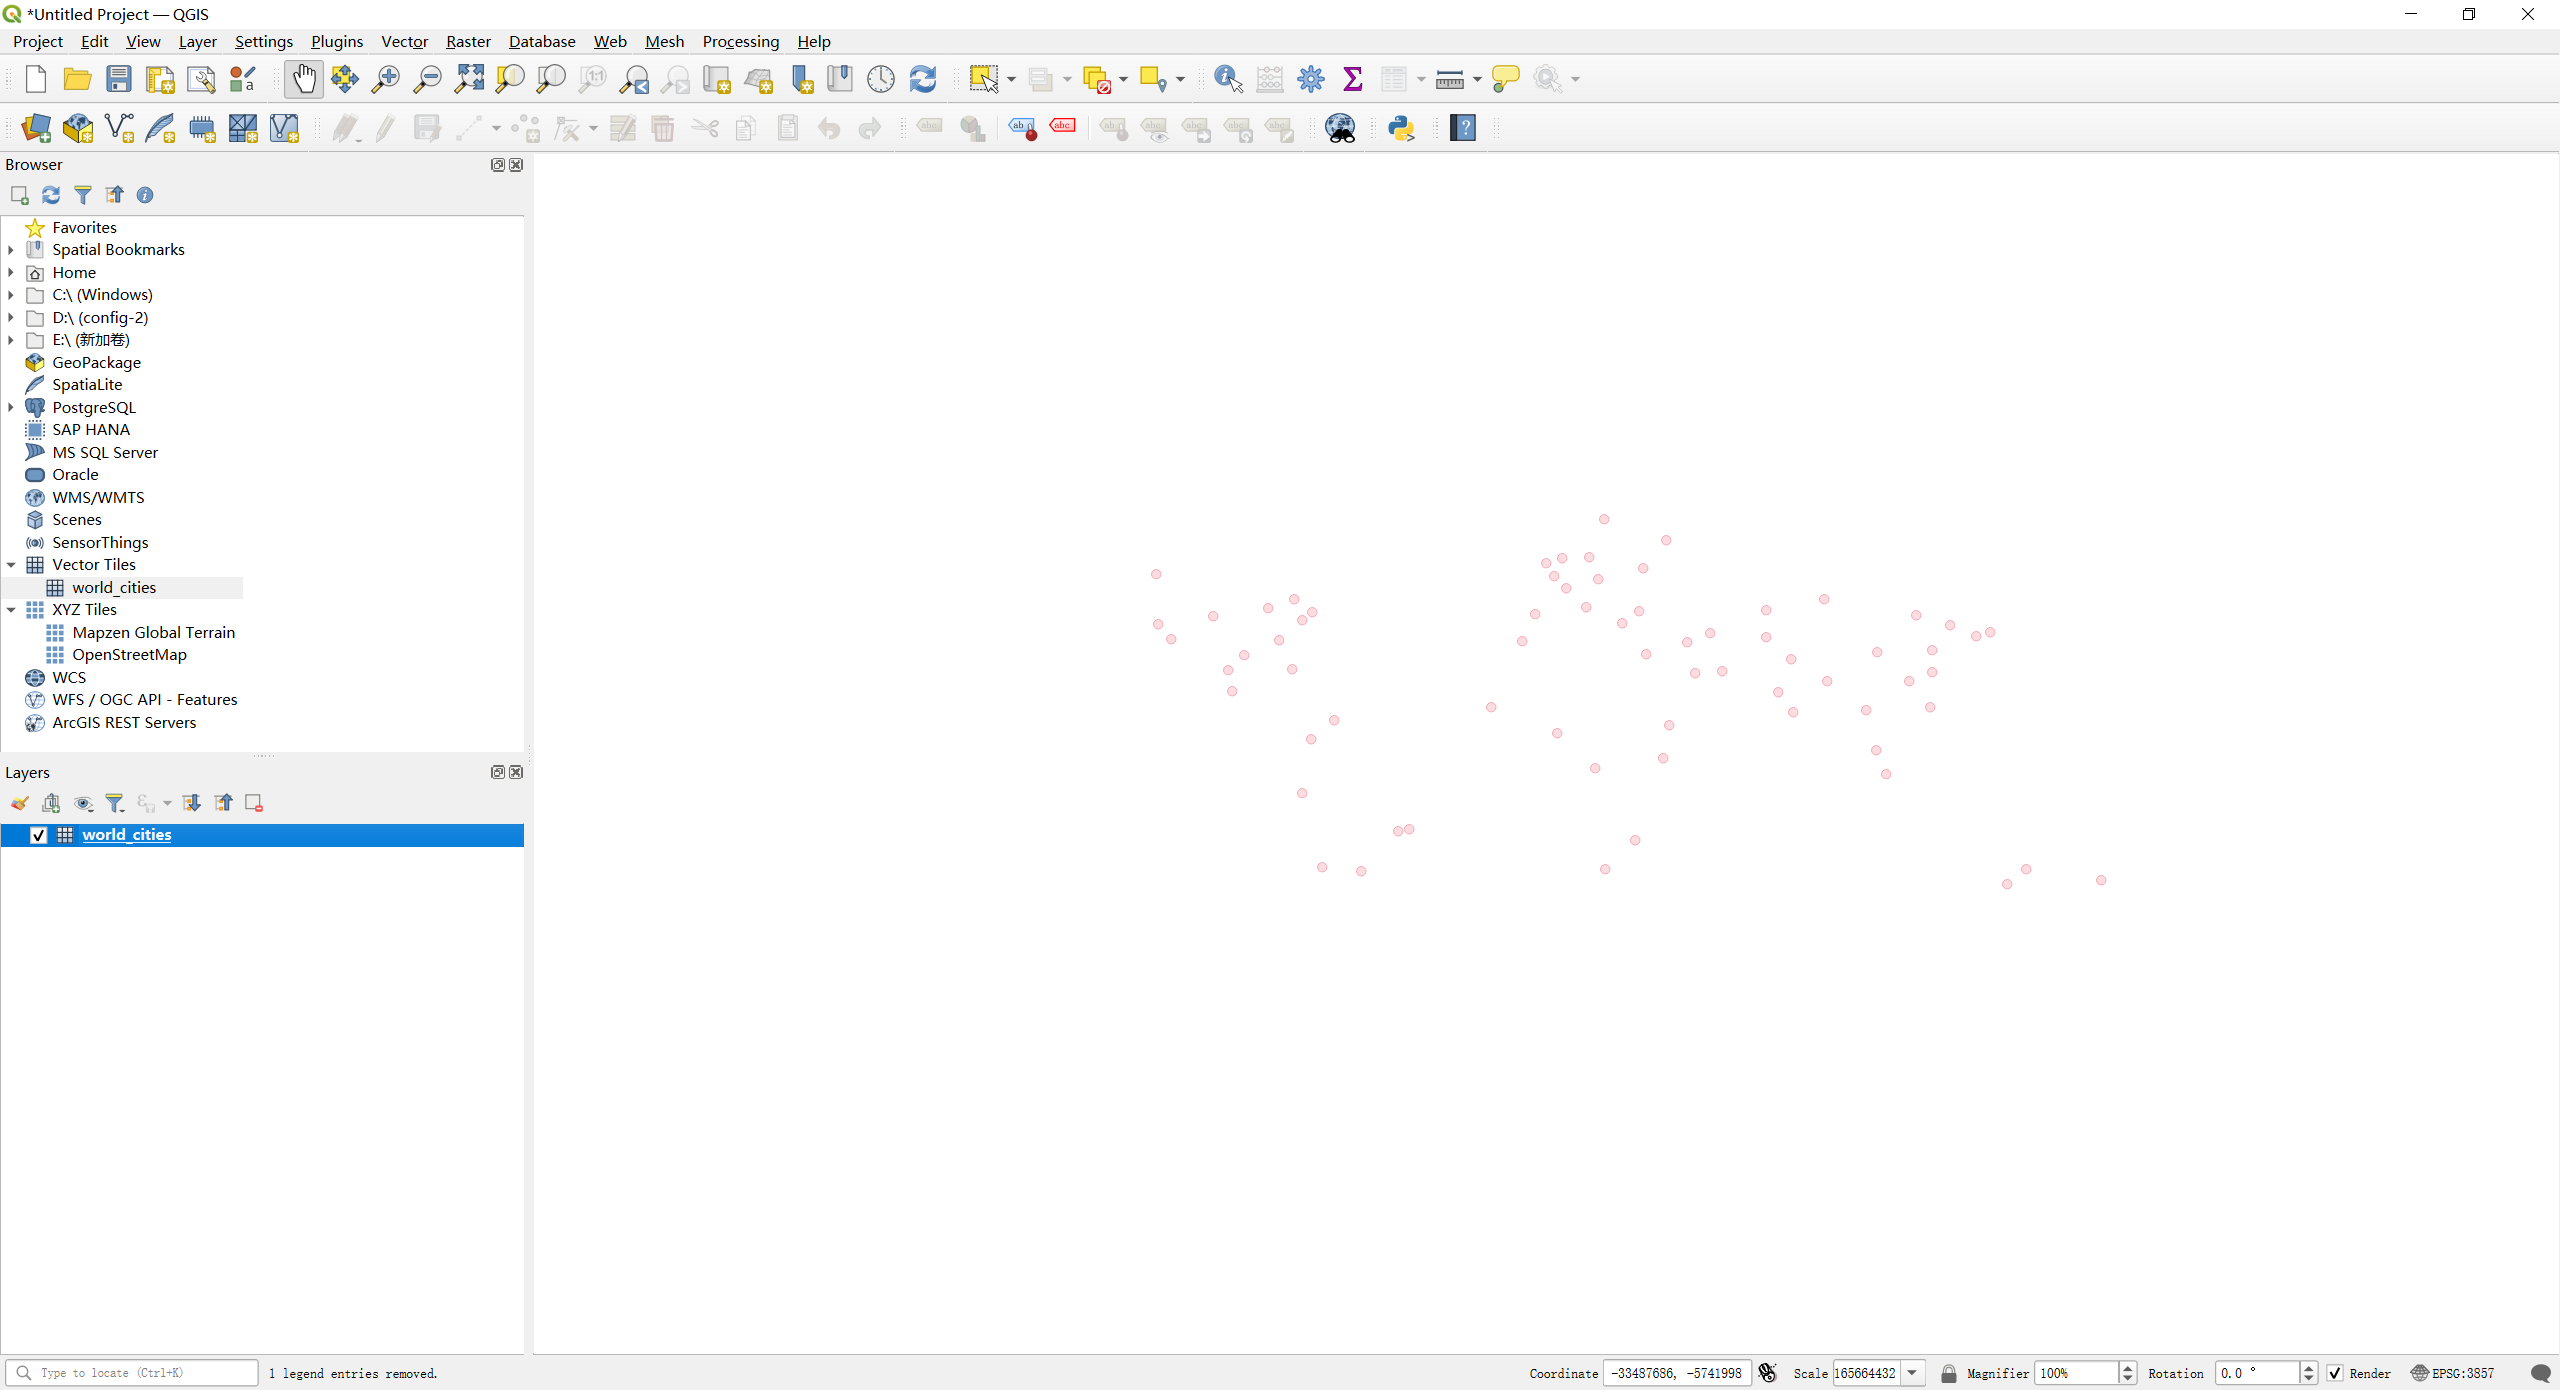
-
The map should now be visible in the QGIS map view.
Installation
Prerequisites
If using Martin with PostgreSQL database, you must install PostGIS with at least v3.0+. Postgis v3.1+ is recommended.
Docker
Martin is also available as a Docker image. You could either share a configuration
file from the host with the container via the -v param, or you can let Martin auto-discover all sources e.g. by
passing DATABASE_URL or specifying the .mbtiles/.pmtiles files or URLs to .pmtiles.
export PGPASSWORD=postgres  # secret!

docker run -p 3000:3000 \
           -e PGPASSWORD \
           -e DATABASE_URL=postgres://user@host:port/db \
           -v /path/to/config/dir:/config \
           ghcr.io/maplibre/martin:1.3.1 \
           --config /config/config.yaml
From Binary Distributions Manually
You can download martin from GitHub releases page.
| Platform | x64 | ARM-64 |
|---|---|---|
| Linux | .tar.gz (gnu) .tar.gz (musl) .deb | .tar.gz (gnu) .tar.gz (musl) |
| macOS | .tar.gz | .tar.gz |
| Windows | .zip |
Rust users can install pre-built martin binary
with cargo-binstall and cargo.
cargo install cargo-binstall
cargo binstall martin
martin --help
From package
To install with apt source and others, We need your help to improve packaging for various platforms.
Homebrew
If you are using macOS and Homebrew you can install martin using Homebrew tap.
brew tap maplibre/martin
brew install martin
martin --help
Debian Packages(x86_64) manually
curl -O https://github.com/maplibre/martin/releases/latest/download/martin-Debian-x86_64.deb
sudo dpkg -i ./martin-Debian-x86_64.deb
martin --help
rm ./martin-Debian-x86_64.deb
Building From source
If you install Rust, you can build martin from source with Cargo:
cargo install martin --locked
martin --help
Usage
Martin requires at least one PostgreSQL connection string or a tile source file
as a command-line argument. A PG connection string can also be passed via the DATABASE_URL environment variable.
martin postgres://postgres@localhost/db
Martin provides TileJSON endpoint for each geospatial-enabled table in your database.
Command Line Interface
Command-line Interface
You can configure Martin using command-line interface.
See martin --help or cargo run -- --help for more information:
Blazing fast and lightweight tile server with PostGIS, MBTiles, and PMTiles support

Usage: martin [OPTIONS] [CONNECTION]...

Arguments:
  [CONNECTION]...
          Connection strings, e.g. postgres://... or /path/to/files

Options:
  -c, --config <CONFIG>
          Path to config file. If set, no tile source-related parameters are allowed

      --save-config <SAVE_CONFIG>
          Save resulting config to a file or use "-" to print to stdout. By default, only print if sources are auto-detected

  -C, --cache-size <CACHE_SIZE>
          Main cache size (in MB)

  -s, --sprite <SPRITE>
          Export a directory with SVG files as a sprite source. Can be specified multiple times

  -f, --font <FONT>
          Export a font file or a directory with font files as a font source (recursive). Can be specified multiple times

  -S, --style <STYLE>
          Export a style file or a directory with style files as a style source (recursive). Can be specified multiple times

  -k, --keep-alive <KEEP_ALIVE>
          Connection keep alive timeout. [DEFAULT: 75]

  -l, --listen-addresses <LISTEN_ADDRESSES>
          The socket address to bind. [DEFAULT: 0.0.0.0:3000]

      --base-path <BASE_PATH>
          Set TileJSON URL path prefix.

          This overrides the default of respecting the X-Rewrite-URL header. Only modifies the JSON (TileJSON) returned, martins' API-URLs remain unchanged. If you need to rewrite URLs, please use a reverse proxy. Must begin with a /.

          Examples: /, /tiles

  -W, --workers <WORKERS>
          Number of web server workers

      --preferred-encoding <PREFERRED_ENCODING>
          Martin server preferred tile encoding. [DEFAULT: gzip]

          If the client accepts multiple compression formats, and the tile source is not pre-compressed, which compression should be used. gzip is faster, but brotli is smaller, and may be faster with caching.

          [possible values: brotli, gzip]

  -u, --webui <WEB_UI>
          Control Martin web UI. [DEFAULT: disabled]

          Possible values:
          - disable:        Disable Web UI interface. This is the default, but once implemented, the default will be enabled for localhost.
          - enable-for-all: Enable Web UI interface on all connections

  -b, --auto-bounds <AUTO_BOUNDS>
          Specify how bounds should be computed for the spatial PG tables. [DEFAULT: quick]

          Possible values:
          - quick: Compute table geometry bounds, but abort if it takes longer than 5 seconds
          - calc:  Compute table geometry bounds. The startup time may be significant. Make sure all GEO columns have indexes
          - skip:  Skip bounds calculation. The bounds will be set to the whole world

      --ca-root-file <CA_ROOT_FILE>
          Loads trusted root certificates from a file. The file should contain a sequence of PEM-formatted CA certificates

  -d, --default-srid <DEFAULT_SRID>
          If a spatial PG table has SRID 0, then this default SRID will be used as a fallback

  -p, --pool-size <POOL_SIZE>
          Maximum Postgres connections pool size [DEFAULT: 20]

  -m, --max-feature-count <MAX_FEATURE_COUNT>
          Limit the number of geo features per tile.

          If the source table has more features than set here, they will not be included in the tile and the result will look "cut off"/incomplete. This feature allows to put a maximum latency bound on tiles with extreme amount of detail at the cost of
          not returning all data. It is sensible to set this limit if you have user generated/untrusted geodata, e.g. a lot of data points at Null Island.

          Can be either a positive integer or unlimited if omitted.

  -h, --help
          Print help (see a summary with '-h')

  -V, --version
          Print version

Use RUST_LOG environment variable to control logging level, e.g. RUST_LOG=debug or RUST_LOG=martin=debug. See https://docs.rs/env_logger/latest/env_logger/index.html#enabling-logging for more information.
Environment Variables
Environment Variables
You can configure Martin using environment variables, but only if the configuration file is not used. The configuration file itself can use environment variables if needed. See configuration section on how to use environment variables with config files. See also SSL configuration section below.
| Environment var Config File key | Example | Description |
|---|---|---|
DATABASE_URL connection_string | postgres://postgres@localhost/db | Postgres database connection |
DEFAULT_SRID default_srid | 4326 | If a PostgreSQL table has a geometry column with SRID=0, use this value instead |
PGSSLCERT ssl_cert | ./postgresql.crt | A file with a client SSL certificate. docs |
PGSSLKEY ssl_key | ./postgresql.key | A file with the key for the client SSL certificate. docs |
PGSSLROOTCERT ssl_root_cert | ./root.crt | A file with trusted root certificate(s). The file should contain a sequence of PEM-formatted CA certificates. docs |
AWS_LAMBDA_RUNTIME_API - | If defined, connect to AWS Lambda to handle requests. The regular HTTP server is not used. See Running in AWS Lambda |
Hosting Environment–specific Guides
To help with common runtimes, we have written the following guides:
Docker
Running with Docker
You can use official Docker image ghcr.io/maplibre/martin
Using Non-Local PostgreSQL
docker run \
  -p 3000:3000 \
  -e DATABASE_URL=postgres://postgres@postgres.example.org/db \
  ghcr.io/maplibre/martin:1.3.1
Exposing Local Files
You can expose local files to the Docker container using the -v flag.
docker run \
  -p 3000:3000 \
  -v /path/to/local/files:/files \
  ghcr.io/maplibre/martin:1.3.1 \
  /files
Accessing Local PostgreSQL on Linux
If you are running PostgreSQL instance on localhost, you have to change network settings to allow the Docker container
to access the localhost network.
For Linux, add the --net=host flag to access the localhost PostgreSQL service. You would not need to export ports
with -p because the container is already using the host network.
docker run \
  --net=host \
  -e DATABASE_URL=postgres://postgres@localhost/db \
  ghcr.io/maplibre/martin:1.3.1
Accessing Local PostgreSQL on macOS
For macOS, use host.docker.internal as hostname to access the localhost PostgreSQL service.
docker run \
  -p 3000:3000 \
  -e DATABASE_URL=postgres://postgres@host.docker.internal/db \
  ghcr.io/maplibre/martin:1.3.1
Accessing Local PostgreSQL on Windows
For Windows, use docker.for.win.localhost as hostname to access the localhost PostgreSQL service.
docker run \
  -p 3000:3000 \
  -e DATABASE_URL=postgres://postgres@docker.for.win.localhost/db \
  ghcr.io/maplibre/martin:1.3.1
Docker Compose
Running with Docker Compose
You can use example docker-compose.yml
file as a reference
services:
  martin:
    image: ghcr.io/maplibre/martin:1.3.1
    restart: unless-stopped
    ports:
      - "3000:3000"
    environment:
      - DATABASE_URL=postgres://postgres:password@db/db
    depends_on:
      - db

  db:
    image: postgis/postgis:17-3.5-alpine
    restart: unless-stopped
    environment:
      - POSTGRES_DB=db
      - POSTGRES_USER=postgres
      - POSTGRES_PASSWORD=password
    volumes:
      # persist PostgreSQL data in a local directory outside of the docker container
      - ./pg_data:/var/lib/postgresql/data
First, you need to start db service
docker compose up -d db
Then, after db service is ready to accept connections, you can start martin
docker compose up -d martin
By default, Martin will be available at localhost:3000
Official Docker image includes a HEALTHCHECK instruction which will be used by Docker Compose. Note that Compose won’t restart unhealthy containers. To monitor and restart unhealthy containers you can use Docker Autoheal.
AWS Lambda
Using with AWS Lambda - v0.14+
Martin can run in AWS Lambda. This is useful if you want to serve tiles from a serverless environment, while accessing “nearby” data from a PostgreSQL database or PMTiles file in S3, without exposing the raw file to the world to prevent download abuse and improve performance.
Lambda has two deployment models: zip file and container-based. When using zip file deployment, there is an online code editor to edit the yaml configuration. When using container-based deployment, we can pass our configuration on the command line or environment variables.
Everything can be performed via AWS CloudShell, or you can install the AWS CLI and the AWS SAM CLI, and configure authentication. The CloudShell also runs in a particular AWS region.
Container deployment
Lambda images must come from a public or private ECR registry. Pull the image from GHCR and push it to ECR.
$ docker pull ghcr.io/maplibre/martin:1.3.1 --platform linux/arm64
$ aws ecr create-repository --repository-name martin
[…]
        "repositoryUri": "493749042871.dkr.ecr.us-east-2.amazonaws.com/martin",

# Read the repositoryUri which includes your account number
$ docker tag ghcr.io/maplibre/martin:1.3.1 493749042871.dkr.ecr.us-east-2.amazonaws.com/martin:latest
$ aws ecr get-login-password --region us-east-2 \
  | docker login --username AWS --password-stdin 493749042871.dkr.ecr.us-east-2.amazonaws.com
$ docker push 493749042871.dkr.ecr.us-east-2.amazonaws.com/martin:latest
Open Lambda console and create your function:
- Click “Create function”.
- Choose “Container image”.
- Put something in “Function name”.
- Note: This is an internal identifier, not exposed in the function URL.
- Click “Browse images”, and select your repository and the tag.
- If you cannot find it, see if you are in the same region?
- Expand “Container image overrides”, and under CMD put the URL of a
.pmtilesfile. - Set “Architecture” to
arm64to match the platform that we pulled. Lambda has better ARM CPUs than x86. - Click “Create function”.
- Find the “Configuration” tab, select “Function URL”, “Create function URL”.
- Set “Auth type” to
NONE- Do not enable
CORS. Martin already hasCORSsupport, so it will create incorrect duplicate headers.
- Do not enable
- Click on the “Function URL”.
- To debug an issue, open the “Monitor” tab, “View CloudWatch logs”, find the most recent Log stream.
Zip deployment
It’s possible to deploy the entire codebase from the AWS console, but we will use Serverless Application Model. Our function will consist of a “Layer”, containing the Martin binary, and our function itself will contain the configuration in yaml format.
The layer
Download the binary and place it in your staging directory. The bin directory of your Layer will be added to the PATH.
mkdir -p martin_layer/src/bin/
cd martin_layer
curl -OL https://github.com/maplibre/martin/releases/latest/download/martin-aarch64-unknown-linux-musl.tar.gz
tar -C src/bin/ -xzf martin-aarch64-unknown-linux-musl.tar.gz martin
Every zip-based Lambda function runs a file called bootstrap.
cat <<EOF >src/bootstrap
#!/bin/sh
set -eu
exec martin --config \${_HANDLER}.yaml
EOF
Write the SAM template.
cat <<EOF >template.yaml
AWSTemplateFormatVersion: 2010-09-09
Transform: 'AWS::Serverless-2016-10-31'
Resources:
  MartinLayer:
    Type: 'AWS::Serverless::LayerVersion'
    DeletionPolicy: Delete
    Properties:
      ContentUri: src
      CompatibleRuntimes:
      - provided.al2023
      CompatibleArchitectures:
      - arm64
Outputs:
  LayerArn:
    Value: !Ref MartinLayer
    Export:
      Name: !Sub "${AWS::StackName}-LayerArn"
EOF
Run sam deploy --guided.
- Stack Name: Name your CloudFormation stack something like
martin-layer. - Press enter for everything else
- The settings are saved to
samconfig.toml, so you can later dosam deployto update the version, orsam delete.
Now if you visit the Lambda console and select “Layers”, you should see your layer.
The function
- Select “Functions”, “Create function”.
- Put something in “Function name”.
- Set “Runtime” to “Amazon Linux 2023”.
- Set “Architecture” to “arm64”.
- Under “Advanced settings”, choose “Enable function URL” with “Auth type” of “NONE”.
- Click “Create function”.
Add your layer:
- Click “add a layer” (green banner at the top, or the very bottom).
- Choose “Custom layers”, and select your layer and its version.
- Click “Add”.
Add your configuration file in the function source code:
-
Code tab, File, New File:
hello.handler.yaml.pmtiles: sources: demotiles: <url to a pmtiles file> -
Click Deploy, wait for the success banner, and visit your function URL.
TODO
AWS Lambda support is preliminary; there are features to add to Martin, configuration to tweak, and documentation to improve. Your help is welcome.
- Lambda has a default timeout of 3 seconds, and 128 MB of memory, maybe this is suboptimal.
- Document how to connect to a PostgreSQL database on RDS.
- Set up a CloudFront CDN, this is a whole thing, but explain the motivation and the basics.
- Grant the execution role permission to read objects from an S3 bucket, and teach Martin how to make authenticated requests to S3.
- Teach Martin how to serve all PMTiles files from an S3 bucket rather than having to list them at startup.
- Teach Martin how to set the Cache-Control and Etag headers for better defaults.
Reverse Proxies
Martin can run without a reverse proxy.
Doing so has a few downsides:
- Martin does not support HTTPS connections (TLS termination).
- We do not check
HOST-headers - we just serve on a port. This means anybody can point their dns record to your server and serve to all requests going to the port Martin is running on. Using a reverse proxy makes this abuse obvious. - Martin only supports a simple in-memory caching. If you need more advanced caching options, you can use a reverse proxy like Nginx, Varnish, or Apache with custom rules. For example, you may choose to only cache zoom 0..10.
- You may need to host more than just tiles at a single domain name.
- Martin has a fixed public API, but your site may require a different structure, e.g. serving tiles with from a sub-path like
/tiles/source/z/x/y.
NGINX
Using with NGINX
You can run Martin behind NGINX proxy, so you can cache frequently accessed tiles with custom logic.
Here is an example docker-compose.yml file that runs Martin with NGINX and PostgreSQL.
version: '3'

services:
  nginx:
    image: nginx:alpine
    restart: unless-stopped
    ports:
      - "80:80"
    volumes:
      - ./cache:/var/cache/nginx
      - ./nginx.conf:/etc/nginx/nginx.conf:ro
    depends_on:
      - martin

  martin:
    image: maplibre/martin:v0.7.0
    restart: unless-stopped
    environment:
      - DATABASE_URL=postgres://postgres:password@db/db
    depends_on:
      - db

  db:
    image: postgis/postgis:14-3.3-alpine
    restart: unless-stopped
    environment:
      - POSTGRES_DB=db
      - POSTGRES_USER=postgres
      - POSTGRES_PASSWORD=password
    volumes:
      - ./pg_data:/var/lib/postgresql/data
You can find an example NGINX configuration file here.
Rewriting URLs
If you are running Martin behind NGINX proxy, you may want to rewrite the request URL to properly handle tile URLs in TileJSON.
location ~ /tiles/(?<fwd_path>.*) {
    proxy_set_header  X-Rewrite-URL $uri;
    proxy_set_header  X-Forwarded-Host $host:$server_port;
    proxy_set_header  X-Forwarded-Proto $scheme;
    proxy_redirect    off;

    proxy_pass        http://martin:3000/$fwd_path$is_args$args;
}
Caching tiles
You can also use NGINX to cache tiles. In the example, the maximum cache size is set to 10GB, and caching time is set to 1 hour for responses with codes 200, 204, and 302 and 1 minute for responses with code 404.
http {
  ...
  proxy_cache_path  /var/cache/nginx/
                    levels=1:2
                    max_size=10g
                    use_temp_path=off
                    keys_zone=tiles_cache:10m;

  server {
    ...
    location ~ /tiles/(?<fwd_path>.*) {
        proxy_set_header        X-Rewrite-URL $uri;
        proxy_set_header        X-Forwarded-Host $host:$server_port;
        proxy_set_header        X-Forwarded-Proto $scheme;
        proxy_redirect          off;

        proxy_cache             tiles_cache;
        proxy_cache_lock        on;
        proxy_cache_revalidate  on;

        # Set caching time for responses
        proxy_cache_valid       200 204 302 1h;
        proxy_cache_valid       404 1m;

        proxy_cache_use_stale   error timeout http_500 http_502 http_503 http_504;
        add_header              X-Cache-Status $upstream_cache_status;

        proxy_pass              http://martin:3000/$fwd_path$is_args$args;
    }
  }
}
You can find an example NGINX configuration file here.
Apache
Using with Apache
You can run Martin behind Apache “kind of” proxy, so you can use HTTPs with it. Here is an example of the configuration file that runs Martin with Apache.
First you have to setup a virtual host that is working on the port 443.
Enable necessary modules
Ensure the required modules are enabled:
sudo a2enmod proxy
sudo a2enmod proxy_http
sudo a2enmod headers
sudo a2enmod rewrite
Modify your VHOST configuration
Open your VHOST configuration file for the domaine you’re using, mydomain.tld :
sudo nano /etc/apache2/sites-available/mydomain.tld.conf
Update the configuration
<VirtualHost *:443>
    ServerName mydomain.tld
    ServerAdmin webmaster@localhost
    DocumentRoot /var/www/mydomain
    ProxyPreserveHost On

    RewriteEngine on
    RewriteCond %{REQUEST_URI} ^/tiles/(.*)$
    RewriteRule ^/tiles/(.*)$ http://localhost:3000/tiles/$1 [P,L]

    <IfModule mod_headers.c>
        RequestHeader set X-Forwarded-Proto "https"
    </IfModule>

    ProxyPass / http://localhost:3000/
    ProxyPassReverse / http://localhost:3000/
</VirtualHost>
Check Configuration: Verify the Apache configuration for syntax errors
sudo apache2ctl configtest
Restart Apache: If the configuration is correct, restart Apache to apply the changes
sudo systemctl restart apache2
Troubleshooting
Troubleshooting
Log levels are controlled on a per-module basis, and by default all logging is disabled except for errors.
Logging is controlled via the RUST_LOG environment variable.
The value of this environment variable is a comma-separated list of logging directives.
This will enable debug logging for all modules:
export RUST_LOG=debug
export RUST_LOG_FORMAT=pretty
martin postgres://postgres@localhost/db
While this will only enable verbose logging for the actix_web module and enable debug logging for the martin
and tokio_postgres modules:
export RUST_LOG=actix_web=info,martin=debug,tokio_postgres=debug
export RUST_LOG_FORMAT=pretty
martin postgres://postgres@localhost/db
We also allow you to control the format of the logs via the RUST_LOG_FORMAT environment variable.
For troubleshooting, pretty or full are likely the most useful formats.
Configuration File
If you don’t want to expose all of your tables and functions, you can list your sources in a configuration file. To
start Martin with a configuration file you need to pass a path to a file with a --config argument. Config files may
contain environment variables, which will be expanded before parsing. For example, to use MY_DATABASE_URL in your
config file: connection_string: ${MY_DATABASE_URL}, or with a
default connection_string: ${MY_DATABASE_URL:-postgres://postgres@localhost/db}
martin --config config.yaml
You may wish to auto-generate a config file with --save-config argument. This will generate a config yaml file with
all of your configuration, which you can edit to remove any sources you don’t want to expose.
martin ... ... ... --save-config config.yaml
Config Example
# Connection keep alive timeout [default: 75]
keep_alive: 75

# The socket address to bind [default: 0.0.0.0:3000]
listen_addresses: "0.0.0.0:3000"

# Set the URL path prefix for all API routes.
# When set, Martin will serve all endpoints under this path prefix.
# This allows Martin to be served under a subpath when behind a reverse proxy (e.g., Traefik).
# Must begin with a `/`.
# Examples: `/tiles`, `/api/v1/tiles`
route_prefix: null

# Set TileJSON URL path prefix.
# This overrides the default path prefix for URLs in TileJSON responses.
# If both `route_prefix` and `base_path` are set, `base_path` takes priority for TileJSON URLs.
# If neither is set, the X-Rewrite-URL header is respected.
# Must begin with a `/`.
# Examples: `/`, `/tiles`
base_path: null

# Number of web server workers
worker_processes: 8

# Amount of memory (in MB) to use for caching [default: 512, 0 to disable]
#
# This is the total amount of cache we use.
# By default, this is split up between:
# - Tiles 50% -> 256 MB
# - Pmtiles' directories 25% -> 128 MB
# - Fonts 12.5% -> 64 MB
# - Sprites 12.5% -> 64 MB
#
# How the cache works internally is unstable and may change to improve performance/efficiency.
# For example, we may change the split between sources to improve efficiency.
#
# Specify each cache size individually for finer cache size control:
# - Tiles: `tile_cache_size_mb`
# - Pmtiles: `pmtiles.directory_cache_size_mb`
# - Fonts: `fonts.cache_size_mb`
# - Sprites: `sprites.cache_size_mb`
cache_size_mb: 512

# Allows overriding the size of the tile cache.
# Defaults to `cache_size_mb` / 2
tile_cache_size_mb: 256

# Which compression should be used if the
# - client accepts multiple compression formats, and
# - tile source is not pre-compressed.
#
# `gzip` is faster, but `brotli` is smaller, and may be faster with caching.
# Default could be different depending on Martin version.
preferred_encoding: gzip

# Enable or disable Martin web UI. [default: disable]
#
# At the moment, only allows `enable-for-all`, which enables the web UI for all connections.
# This may be undesirable in a production environment
web_ui: disable

# The policy for handling invalid sources during startup. [default: abort]
#
# Invalid sources are those that are missing (file not found, table doesn't exist, ...),
# reference columns that don't exist, and so on.
# Currently limited to tile sources; broader rollout is planned.
#
# Options:
# - `warn`: log warning messages
# - `abort`: log warnings as error messages, abort startup
on_invalid: abort

# Advanced monitoring options
observability:
  # Configure metrics reported under `/_/metrics`
  metrics:
    # Add these labels to every metric
    # Example: `{ env: prod, server: martin }`
    add_labels: {}

# CORS Configuration
#
# Defaults to `cors: true`, which allows all origins.
# Sending/Acting on CORS headers can be completely disabled via `cors: false`
cors:
  # Sets the `Access-Control-Allow-Origin` header [default: *]
  # '*' will use the requests `ORIGIN` header
  origin:
    - https://example.org
  # Sets `Access-Control-Max-Age` Header. [default: null]
  # null means not setting the header for preflight requests
  max_age: 3600

# Database configuration. This can also be a list of PG configs.
postgres:
  # Database connection string.
  #
  # You can use environment variables too, for example:
  # connection_string: $DATABASE_URL
  # connection_string: ${DATABASE_URL:-postgres://postgres@localhost/db}
  connection_string: "postgres://postgres@localhost:5432/db"

  # Same as PGSSLCERT for psql
  ssl_cert: "./postgresql.crt"
  # Same as PGSSLKEY for psql
  ssl_key: "./postgresql.key"
  # Same as PGSSLROOTCERT for psql
  ssl_root_cert: "./root.crt"

  # If a spatial table has SRID 0, then this SRID will be used as a fallback
  default_srid: 4326

  # Maximum Postgres connections pool size [default: 20]
  pool_size: 20

  # Limit the number of geo features per tile.
  #
  # If the source table has more features than set here, they will not be
  # included in the tile and the result will look "cut off"/incomplete.
  # This feature allows you to put a maximum latency bound on tiles with an
  # extreme amount of detail at the cost of not returning all data.
  # It is sensible to set this limit if you have user generated/untrusted
  # geodata, e.g. a lot of data points at [Null Island]
  # (https://en.wikipedia.org/wiki/Null_Island).
  max_feature_count: null # either a positive integer, or null=unlimited (default)

  # Specify how bounds should be computed for the spatial PG tables [default: quick]
  #
  # Options:
  # - `calc` compute table geometry bounds on startup.
  # - `quick` same as 'calc', but the calculation will be aborted after 5 seconds.
  # - `skip` does not compute table geometry bounds on startup.
  auto_bounds: quick

  # Enable automatic discovery of tables and functions. [default: null]
  #
  # Options:
  # - `true`: run automatic discovery (`true` may be omitted if further configuration is provided)
  # - `false`: disable automatic discovery
  # - null: run automatic discovery if postgres.tables is null and postgres.functions is null
  auto_publish:
    # Optionally limit to just these schemas
    from_schemas:
      - public
      - my_schema
    # Here we enable both tables and functions auto discovery.
    # You can also enable just one of them by not mentioning the other, or
    # setting it to false. Setting one to true disables the other one as well.
    # E.g. `tables: false` enables just the functions auto-discovery.
    tables:
      # Optionally set how source ID should be generated based on the table's name,
      # schema, and geometry column
      source_id_format: "table.{schema}.{table}.{column}"
      # Add more schemas to the ones listed above
      from_schemas: my_other_schema
      # A table column to use as the feature ID
      # If a table has no column with this name, `id_column` will not be set for
      # that table.
      # If a list of strings is given, the first found column will be treated as a
      # feature ID.
      id_columns: feature_id
      # Controls if geometries should be clipped or encoded as is [default: true]
      clip_geom: true
      # Buffer distance in tile coordinate space to optionally clip geometries,
      # optional, default to 64
      buffer: 64
      # Tile extent in tile coordinate space, optional, default to 4096
      extent: 4096
    functions:
      # Optionally limit to just these schemas
      from_schemas:
        - public
        - my_schema
      # Optionally set how source ID should be generated based on the function's
      # name and schema
      source_id_format: "{schema}.{function}"

  # Associative arrays of table sources
  tables:
    table_source_id:
      # ID of the MVT layer (optional, defaults to table name)
      layer_id: table_source

      # Table schema (required)
      schema: public

      # Table name (required)
      table: table_source

      # Geometry SRID (required)
      srid: 4326

      # Geometry column name (required)
      geometry_column: geom

      # Feature id column name
      id_column: ~

      # An integer specifying the minimum zoom level
      minzoom: 0

      # An integer specifying the maximum zoom level. MUST be >= minzoom
      maxzoom: 30

      # The maximum extent of available map tiles. Bounds MUST define an area
      # covered by all zoom levels. The bounds are represented in WGS:84 latitude
      # and longitude values, in the order left, bottom, right, top. Values may
      # be integers or floating point numbers.
      bounds: [-180.0, -90.0, 180.0, 90.0]

      # Tile extent in tile coordinate space
      extent: 4096

      # Buffer distance in tile coordinate space to optionally clip geometries
      buffer: 64

      # Boolean to control if geometries should be clipped or encoded as is
      clip_geom: true

      # Geometry type
      geometry_type: GEOMETRY

      # List of columns, that should be encoded as tile properties (required)
      #
      # Keys and values are the names and descriptions of attributes available in this layer.
      # Each value (description) must be a string that describes the underlying data.
      # If no fields (=just the geometry) should be encoded, an empty object is allowed.
      properties:
        gid: int4

  # Associative arrays of function sources
  functions:
    function_source_id:
      # Schema name (required)
      schema: public

      # Function name (required)
      function: function_zxy_query

      # An integer specifying the minimum zoom level
      minzoom: 0

      # An integer specifying the maximum zoom level. MUST be >= minzoom
      maxzoom: 30

      # The maximum extent of available map tiles. Bounds MUST define an area
      # covered by all zoom levels. The bounds are represented in WGS:84
      # latitude and longitude values, in the order left, bottom, right, top.
      # Values may be integers or floating point numbers.
      bounds: [-180.0, -90.0, 180.0, 90.0]

# Publish PMTiles files from local disk or proxy to a web server
pmtiles:
  # Size of the directory cache (in MB).
  # Defaults to cache_size_mb / 4
  #
  # Note:
  # Tile and directory caching are complementary.
  # For good performance, you want
  # - directory caching (to not resolve the directory on each request) and
  # - tile caching (for high access tiles)
  directory_cache_size_mb: 128

  # You can pass options for pmtiles files located on remote storages here.
  #
  # The avaliable options are documented here:
  # - local file sources don't have options
  # - Http(s) Source: https://docs.rs/object_store/latest/object_store/http/struct.HttpBuilder.html
  # - Amazon S3: https://docs.rs/object_store/latest/object_store/aws/struct.AmazonS3Builder.html
  # - Google Cloud Storage: https://docs.rs/object_store/latest/object_store/gcp/struct.GoogleCloudStorageBuilder.html
  # - Microsoft Azure: https://docs.rs/object_store/latest/object_store/azure/struct.MicrosoftAzureBuilder.html
  #
  # Example for configuring a source to allow http
  allow_http: true

  paths:
    # scan this whole dir, matching all *.pmtiles files
    - /dir-path
    # specific pmtiles file will be published as a pmt source (filename without extension)
    - /path/to/pmt.pmtiles
    # A web server with a PMTiles file that supports range requests
    - https://example.org/path/tiles.pmtiles
  sources:
    # named source matching source name to a single file
    pm-src1: /path/to/pmt.pmtiles
    # A named source to a web server with a PMTiles file that supports range requests
    pm-web2: https://example.org/path/tiles.pmtiles

# Publish MBTiles files
mbtiles:
  paths:
    # scan this whole dir, matching all *.mbtiles files
    - /dir-path
    # specific mbtiles file will be published as mbtiles2 source
    - /path/to/mbtiles.mbtiles
  sources:
    # named source matching source name to a single file
    mb-src1: /path/to/mbtiles1.mbtiles

# Sprite configuration
sprites:
  # Size of the sprite cache (in MB).
  # Defaults to cache_size_mb / 8
  cache_size_mb: 64

  paths:
    # all SVG files in this dir will be published as a "my_images" sprite source
    - /path/to/my_images
  sources:
    # SVG images in this directory will be published as a "my_sprites" sprite source
    my_sprites: /path/to/some_dir

# Font configuration
fonts:
  # Size of the sprite cache (in MB).
  # Defaults to cache_size_mb / 4
  cache_size_mb: 64

  # A list of *.otf, *.ttf, and *.ttc font files and dirs to search recursively.
  paths:
    - /path/to/font/file.ttf
    - /path/to/font_dir

# Publish MapLibre style files
# In the future, the style files will be used for the server-side rendering as well
styles:
  paths:
    # publish all *.json files in this directory
    # The name of the file will be used as the style name
    - /path/to/styles_dir
    # publish a single file - here `maplibre_style` will be the style name
    - /path/to/maplibre_style.json
  sources:
    # publish a JSON file found at this path as `some_style_name`
    #
    # Contrairy to paths, if directories are specified, Martin will print a
    # warning and ignore them.
    # To serve a style-directory, use the `paths` section above or name each
    # style individually. This prevents footguns with names being unclear.
    some_style_name: /path/to/this/style.json
    #  Publish specific file as `other_style_name`
    other_style_name: /path/to/other_style.json

# If set, the version of the tileset (as specified in the MBTiles or PMTiles metadata)
# will be embedded in the TileJSON `tiles` URL, with the set identifier.
# This is useful to give clients a better way to cache-bust a CDN:
# 1. maplibre requests tilejson, tilejson contains the tiles URL. This is always up-to-date.
# 2. maplibre requests each tile it requires, with the tiles URL in the tilejson.
# 3. Add `Control: public, max-age=..., immutable` on the tile responses
#    optimize browser/CDN cache hit rates, while also making sure that
#    old tiles aren't served when a new tileset is deployed.
#
# The CDN must handle query parameters for caching to work correctly.
# Many CDNs ignore them by default.
#
# For example, if
# - the setting here is `version`, and
# - the PMTiles tileset version is `1.0.0`, the
# TileJSON will be:
# { ..., "tiles": [".../{z}/{x}/{y}?version=1.0.0"], ... }
tilejson_url_version_param: null # a string, such as `version` or `v`
Tile Sources
Martin supports multiple tile sources
- MBTiles Sources Local Sqlite database containing pre-generated vector or raster tiles.
- PMTiles Sources A local file or a web-accessible HTTP source with the pre-generated raster or vector tiles.
- PostgreSQL Connections with
The difference between tile archives (MBTiles/PMTiles) and a database (PG-Table/PG-Function) is that
- database are more flexible and may (depending on how you fill it) be updated in real-time.
- Tile archives on the other hand may (depending on the data) be more compact, memory efficient and exhibit better performance for tile-serving.
=> For most usecases, you may want a mix of both. We support this via Composite Sources
=> For some usecases, you want the flexibility of a database, but you don’t want to pay the runtime-price. We offer the martin-cp utility to render all tiles into a tile archive. This can also be used to provide offline maps via diffing and syncing mbtiles
The difference between MBTiles and PMTiles is that:
- MBTiles require the entire archive to be on the same machine. PMTiles can utilise a remote HTTP-Range request supporting server or a local file.
- Performance wise, MBTiles is slightly faster than PMTiles, but with caching this is negligible.
- Disk size wise, MBTiles is slightly (10-15%) higher than PMTiles.
- PMTiles requires less memory in extreme cases as sqlite has a small in-memory cache.
The choice depends on your specific usecase and requirements.
MBTiles and PMTiles File Sources
MBTiles and PMTiles File Sources
Martin can serve any type of tiles from PMTile
and MBTile files. To serve a file from CLI, simply put the path to the file or
the directory with *.mbtiles or *.pmtiles files. A path to PMTiles file may be a URL. For example:
martin /path/to/mbtiles/file.mbtiles /path/to/directory https://example.org/path/tiles.pmtiles
You may also want to generate a config file using the --save-config my-config.yaml, and later edit
it and use it with --config my-config.yaml option.
Tip
See our tile sources explanation for a more detailed explanation on the difference between our available data sources.
Autodiscovery
For mbtiles or local pmtiles files, we support auto discovering at startup. This means that the following will discover all mbtiles and pmtiles files in the directory:
martin /path/to/directory
Warning
For remote PMTiles, we don’t currently support auto-discovery. If you want to implement this feature, please see https://github.com/maplibre/martin/issues/2180
We also don’t currently support refreshing the catalog at runtime. If you want to implement this feature, please see https://github.com/maplibre/martin/issues/288 instead.
Serving PMTiles from local file systems, http or Object Storage
The settings avaliable for a PMTiles source depend on the backend:
For local sources, you need to provide the path or URL. For example:
martin path/to/tiles.pmtiles
The available schemes are:
file:///path/to/my/file.pmtilespath/to/my/file.pmtiles
You can also configure this via the configuration file:
pmtiles:
  sources:
    tiles: file:///path/to/my/file.pmtiles
PostgreSQL Connections
PostgreSQL Connections
Martin supports standard PostgreSQL connection string settings including host, port, user, password, dbname, sslmode, connect_timeout, keepalives, keepalives_idle, etc.
See the PostgreSQL docs for more details.
SSL Connections
Martin supports PostgreSQL sslmode settings: disable, prefer, require, verify-ca and verify-full.
See the PostgreSQL docs for mode descriptions.
Certificates can be provided in the configuration file or via environment variables (same as psql).
Environment variables apply to all PostgreSQL connections.
See environment vars for details.
By default, sslmode is prefer - encrypt (don’t check certificates) if the server supports it, but the connection proceeds without SSL if not supported.
This matches psql default behavior.
If you require guarnatees regarding eavesdropping or MITM protection, you need a different option.
Use the sslmode parameter to specify a different mode:
martin postgres://user:password@host/db?sslmode=verify-full
For a practical walkthrough of SSL certificate setup — including creation, configuration, and troubleshooting — see our PostgreSQL SSL Certificates Recipe.
PostgreSQL Table Sources
Table Source is a database table which can be used to query vector tiles. If a PostgreSQL connection string is given, Martin will publish all tables as data sources if they have at least one geometry column. If geometry column SRID is 0, a default SRID must be set, or else that geo-column/table will be ignored. All non-geometry table columns will be published as vector tile feature tags (properties).
Modifying Tilejson
Martin will automatically generate a TileJSON manifest for each table source. It will contain the name, description, minzoom, maxzoom, bounds and vector_layer information.
For example, if there is a table public.table_source:
the default TileJSON might look like this (note that URL will be automatically adjusted to match the request host):
The table:
CREATE TABLE "public"."table_source" (
  "gid" int4 NOT NULL,
  "geom" "public"."geometry"
);
The TileJSON:
{
    "tilejson": "3.0.0",
    "tiles": [
        "http://localhost:3000/table_source/{z}/{x}/{y}"
    ],
    "vector_layers": [
        {
            "id": "table_source",
            "fields": {
                "gid": "int4"
            }
        }
    ],
    "bounds": [
        -2.0,
        -1.0,
        142.84131509869133,
        45.0
    ],
    "description": "public.table_source.geom",
    "name": "table_source"
}
By default the description and name is database identifies about this table, and the bounds is queried from database. You can fine tune these by adjusting auto_publish section in configuration file.
TileJSON in SQL Comments
Other than adjusting auto_publish section in configuration file, you can fine tune the TileJSON on the database side directly: Add a valid JSON as an SQL comment on the table.
Martin will merge table comment into the generated TileJSON using JSON Merge patch. The following example update description and adds attribution, version, foo(even a nested DIY field) fields to the TileJSON.
DO $do$ BEGIN
    EXECUTE 'COMMENT ON TABLE table_source IS $tj$' || $$
    {
        "version": "1.2.3",
        "attribution": "osm",
        "description": "a description from table comment",
        "foo": {"bar": "foo"}
    }
    $$::json || '$tj$';
END $do$;
PostgreSQL Function Sources
PostgreSQL Function Sources
Function Source is a database function which can be used to query vector tiles. When started, Martin will look for the functions with a suitable signature.
A function can be used as a Function Source if it returns either a bytea value, or a record with bytea and a text values. The text value is expected to be a user-defined hash, e.g. an MD5 value, and it will eventually be used as an ETag.
A valid function must also have these arguments:
| Argument | Type | Description |
|---|---|---|
z (or zoom) | integer | Tile zoom parameter |
x | integer | Tile x parameter |
y | integer | Tile y parameter |
query (optional, any name) | json | Query string parameters |
Simple Function with coordinate projection
For example, if you have a table with arbitrary geometry table_source in WGS84 (4326 SRID).
If we need the tables’ row field_color and geometry geom as a function source, then it can be written as:
CREATE OR REPLACE
    FUNCTION function_zxy(z integer, x integer, y integer)
    RETURNS bytea AS $$
DECLARE
  mvt bytea;
BEGIN
  SELECT INTO mvt ST_AsMVT(tile, 'function_zxy', 4096, 'geom') FROM (
    SELECT
      ST_AsMVTGeom(
          ST_Transform(ST_CurveToLine(geom), 3857),
          ST_TileEnvelope(z, x, y),
          4096, 64, true) AS geom,
        field_color AS color
    FROM table_source
    WHERE geom && ST_Transform(ST_TileEnvelope(z, x, y), 4326)
  ) as tile WHERE geom IS NOT NULL;

  RETURN mvt;
END
$$ LANGUAGE plpgsql IMMUTABLE STRICT PARALLEL SAFE;
Tip
By default,
ST_TileEnvelopeproduces3857SRID andST_AsMVTGeomconsumes3857SRID. Many tooling (for exampleosm2pgsql) thus directly store their data in3857SRID for lower processing overhead. If your data is in3857SRID, you can remove the twoST_Transformcalls.
Lets explain a few of the aspects of the function:
ST_Transform(ST_CurveToLine(geom), 3857)
- Since the table in the example can contain arbitrary geometries, we need to transform
CIRCULARSTRINGgeometry types. Concretely, we useST_CurveToLineto convert a- CIRCULAR STRING to regular LINESTRING,
- CURVEPOLYGON to POLYGON or
- MULTISURFACE to MULTIPOLYGON.
ST_Transformis necessary asST_CurveToLinereturns a geometry in4326SRID, which is the SRID of stored geometry in the example.
WHERE geom && ST_Transform(ST_TileEnvelope(z, x, y), 4326)
&&is the spatial intersection operator. Thus it checks if the geometry intersects with the tile envelope and uses spatial indexes.ST_Transformis used to transform the tile envelope from3857SRID to4326SRID, asgeomin our example is in4326SRID.
Note
The planning mode
IMMUTABLE STRICT PARALLEL SAFEallows postgres further freedom to optimize our function. Your function is likely to be the same category as the example, but be careful to not cause unexpected behavior.
IMMUTABLEThe function does not have side effects.Indicates that the function cannot modify the database and always returns the same result when given the same argument values; that is, it does not do database lookups or otherwise use information not directly present in its argument list. If this option is given, any call of the function with all-constant arguments can be immediately replaced with the function value.
STRICT: Our function will not be called if any of the arguments areNULL.
PARALLEL SAFE: Our function is safe to call in parallel as it does not modify the database, nor use randomness or temporary tables.Functions should be labeled parallel unsafe if they
- modify any database state,
- change the transaction state (other than by using a subtransaction for error recovery),
- access sequences (e.g., by calling currval) or
- make persistent changes to settings.
They should be labeled parallel restricted if they
- access temporary tables,
- client connection state,
- cursors,
- prepared statements, or
- miscellaneous backend-local state which the system cannot synchronize in parallel mode (e.g., setseed cannot be executed other than by the group leader because a change made by another process would not be reflected in the leader).
In general, if a function is labeled as being safe when it is restricted or unsafe, or if it is labeled as being restricted when it is in fact unsafe, it may throw errors or produce wrong answers when used in a parallel query. C-language functions could in theory exhibit totally undefined behavior if mislabeled, since there is no way for the system to protect itself against arbitrary C code, but in most likely cases the result will be no worse than for any other function. If in doubt, functions should be labeled as UNSAFE, which is the default.
Function with Query Parameters
Users may add a query parameter to pass additional parameters to the function.
The query_params argument is a JSON representation of the tile request query params. Query params could be passed as
simple query values, e.g.
curl localhost:3000/function_zxy_query/0/0/0?answer=42
You can also use urlencoded params to encode complex values:
curl \
  --data-urlencode 'arrayParam=[1, 2, 3]' \
  --data-urlencode 'numberParam=42' \
  --data-urlencode 'stringParam=value' \
  --data-urlencode 'booleanParam=true' \
  --data-urlencode 'objectParam={"answer" : 42}' \
  --get localhost:3000/function_zxy_query/0/0/0
then query_params will be parsed as:
{
  "arrayParam": [1, 2, 3],
  "numberParam": 42,
  "stringParam": "value",
  "booleanParam": true,
  "objectParam": { "answer": 42 }
}
You can access this params using json operators:
...WHERE answer = (query_params->'objectParam'->>'answer')::int;
As an example, our table_source in WGS84 (4326 SRID) has a column answer of type integer.
The function function_zxy_query will return a MVT tile with the answer column as a property.
CREATE OR REPLACE
    FUNCTION function_zxy_query(z integer, x integer, y integer, query_params json)
    RETURNS bytea AS $$
DECLARE
  mvt bytea;
BEGIN
  SELECT INTO mvt ST_AsMVT(tile, 'function_zxy_query', 4096, 'geom') FROM (
    SELECT
      ST_AsMVTGeom(
          ST_Transform(ST_CurveToLine(geom), 3857),
          ST_TileEnvelope(z, x, y),
          4096, 64, true) AS geom
    FROM table_source
    WHERE geom && ST_Transform(ST_TileEnvelope(z, x, y), 4326) AND
          answer = (query_params->>'answer')::int
  ) as tile WHERE geom IS NOT NULL;

  RETURN mvt;
END
$$ LANGUAGE plpgsql IMMUTABLE STRICT PARALLEL SAFE;
Modifying TileJSON
Martin will automatically generate a basic TileJSON manifest for each
function source.
This will contain the name and description of the function, plus optionally minzoom, maxzoom, and bounds
(if they were specified via one of the configuration methods).
For example, if there is a function public.function_zxy_query_jsonb, the default TileJSON might look like this:
{
  "tilejson": "3.0.0",
  "tiles": [
    "http://localhost:3111/function_zxy_query_jsonb/{z}/{x}/{y}"
  ],
  "name": "function_zxy_query_jsonb",
  "description": "public.function_zxy_query_jsonb"
}
Note
The URL will be automatically adjusted to match the request host
TileJSON in SQL Comments
To modify automatically generated TileJSON, you can add a valid JSON as an SQL comment on the function.
Martin will merge function comment into the generated TileJSON using JSON Merge patch.
The following example adds attribution and version fields to the TileJSON.
Note
This example uses
EXECUTEto ensure that the comment is a valid JSON (or else PostgreSQL will throw an error). You can use other methods of creating SQL comments.
DO $do$ BEGIN
    EXECUTE 'COMMENT ON FUNCTION my_function_name IS $tj$' || $$
    {
        "description": "my new description",
        "attribution": "my attribution",
        "vector_layers": [
            {
                "id": "my_layer_id",
                "fields": {
                    "field1": "String",
                    "field2": "Number"
                }
            }
        ]
    }
    $$::json || '$tj$';
END $do$;
Cloud Optimized GeoTIFF File Sources
Warning
This feature is currently unstable and thus not included in the default build. Its behaviour may change in patch releases.
To experiment with it, install Rust, and run this to download, compile, and install martin with the unstable feature:
cargo install martin --features=unstable-cogIt is unstable due to the limitations of our current implementation:
EPSG:3857is not yet supported => https://github.com/maplibre/martin/pull/1893We welcome contributions to help stabilise this feature!
Martin supports serving raster sources like local COG(Cloud Optimized GeoTIFF) files.
Note
For cog on remote storage like S3 and other improvements, you could track them on issue 875. We welcome any assistance.
Supported colortype and bits per sample
| colory type | bits per sample | supported | status |
|---|---|---|---|
| rgb/rgba | 8 | ✅ | |
| rgb/rgba | 16/32… | 🛠️ | working on |
| gray | 8/16/32… | 🛠️ | working on |
Supported compression
- None
- LZW
- Deflate
- PackBits
Run Martin with CLI to serve cog files
# Configured with a directory containing `*.tif` or `*.tiff` TIFF files.
martin /with/tiff/dir1 /with/tiff/dir2
# Configured with dedicated TIFF file
martin /path/to/target1.tif /path/to/target2.tiff
# Configured with a combination of directories and dedicated TIFF files.
martin /with/tiff/files /path/to/target1.tif /path/to/target2.tiff
Run Martin with configuration file
To add a COG in martin, simply add
# Cloud Optimized GeoTIFF File Sources
cog:
  paths:
    # scan this whole dir, matching all *.tif and *.tiff files
    - /dir-path
    # specific TIFF file will be published as a cog source
    - /path/to/cog_file1.tif
    - /path/to/cog_file2.tiff
  sources:
    # named source matching source name to a single file
     cog-src1: /path/to/cog1.tif
     cog-src2: /path/to/cog2.tif
About COG
COG is just Cloud Optimized GeoTIFF file.
TIFF is an image file format. TIFF tags are something like key-value pairs inside to describe the metadata about a TIFF file, ike ImageWidth, ImageLength, etc.
GeoTIFF is a valid TIFF file with a set of TIFF tags to describe the ‘Cartographic’ information associated with it.
COG is a valid GeoTIFF file with some requirements for efficient reading. That is, all COG files are valid GeoTIFF files, but not all GeoTIFF files are valid COG files. For quick access to tiles in TIFF files, Martin relies on the requirements/recommendations(like the requirement about Reduced-Resolution Subfiles and the content dividing strategy) so we use the term COG over GeoTIFF in our documentation and configuration files.
You may want to visit these specs:
COG generation with GDAL
You could generate cog with gdal_translate or gdalwarp. See more details in gdal doc.
# gdal-bin installation
# sudo apt update
# sudo apt install gdal-bin

# gdalwarp
gdalwarp src1.tif src2.tif out.tif -of COG

# or gdal_translate
gdal_translate input.tif output_cog.tif -of COG
The mapping from ZXY to tiff chunk
- A single TIFF file could contains many sub-file about same spatial area, each has different resolution
- A sub file is organized with many tiles
So basically there’s a mapping from zxy to tile of sub-file of TIFF.
| zxy | mapping to |
|---|---|
| Zoom level | which sub-file in TIFF file |
| X and Y | which tile in subfile |
Clients could read only the header part of COG to figure out the mapping from zxy to the chunk number and the subfile number. Martin get tile to frontend by this mapping.
Composite Sources
Composite Sources
Composite Sources allows combining multiple sources into one. Composite Source consists of multiple sources separated by
comma {source1},...,{sourceN}
Each source in a composite source can be accessed with its {source_name} as a source-layer property.
Composite source TileJSON endpoint is available
at /{source1},...,{sourceN}, and tiles are available at /{source1},...,{sourceN}/{z}/{x}/{y}.
For example, composite source combining points and lines sources will be available at /points,lines/{z}/{x}/{y}
# TileJSON
curl localhost:3000/points,lines

# Whole world as a single tile
curl localhost:3000/points,lines/0/0/0
Supporting Resources
Data alone is not enough to show an interactive map. A map requires data, but it also requires fonts, sprites (sometimes called glyphs) and (dependent on the rendering engine) a style.
Sprites
Sprite Sources
Given a directory with SVG images, Martin will generate a sprite – a JSON index and a PNG image, for both low and highresolution displays.
The SVG filenames without extension will be used as the sprites’ image IDs (remember that one sprite and thus sprite_id contains multiple images).
The images are searched recursively in the given directory, so subdirectory names will be used as prefixes for the image IDs.
For example icons/bicycle.svg will be available as icons/bicycle sprite image.
The spritesheet generation is cached and the size of this cache can be configured via sprites.cache_size_mb in the config file.
API
Martin uses MapLibre sprites API specification to serve sprites via several endpoints. The sprite image and index are generated on the fly, so if the sprite directory is updated, the changes will be reflected immediately.
You can use the /catalog api to see all the <sprite_id>s with their contained sprites.
Sprite PNG
![]()
GET /sprite/<sprite_id>.png endpoint contains a single PNG sprite image that combines all sources images.
Additionally, there is a high DPI version available at GET /sprite/<sprite_id>@2x.png.
Sprite index
/sprite/<sprite_id>.json metadata index describing the position and size of each image inside the sprite. Just like
the PNG, there is a high DPI version available at /sprite/<sprite_id>@2x.json.
{
  "bicycle": {
    "height": 15,
    "pixelRatio": 1,
    "width": 15,
    "x": 20,
    "y": 16
  },
  ...
}
Coloring at runtime via Signed Distance Fields (SDFs)
If you want to set the color of a sprite at runtime, you will need use the Signed Distance Fields (SDFs)-endpoints.
For example, maplibre does support the image being modified via the icon-color and icon-halo-color properties if using SDFs.
SDFs have the significant downside of only allowing one color. If you want multiple colors, you will need to layer icons on top of each other.
The following APIs are available:
/sdf_sprite/<sprite_id>.jsonfor getting a sprite index as SDF and/sdf_sprite/<sprite_id>.pngfor getting sprite PNGs as SDF
Combining Multiple Sprites
Multiple sprite_id values can be combined into one sprite with the same pattern as for tile
joining: /sprite/<sprite_id1>,<sprite_id2>,...,<sprite_idN>. No ID renaming is done, so identical sprite names will
override one another.
Configuring from CLI
A sprite directory can be configured from the CLI with the --sprite flag. The flag can be used multiple times to
configure multiple sprite directories. The sprite_id of the sprite will be the name of the directory – in the example below,
the sprites will be available at /sprite/sprite_a and /sprite/sprite_b. Use --save-config to save the
configuration to the config file.
martin --sprite /path/to/sprite_a --sprite /path/to/other/sprite_b
Configuring with Config File
A sprite directory can be configured from the config file with the sprite key, similar to
how MBTiles and PMTiles are configured.
# Sprite configuration
sprites:
  paths:
    # all SVG files in this directory will be published under the sprite_id "my_images"
    - /path/to/my_images
  sources:
    # SVG images in this directory will be published under the sprite_id "my_sprites"
    my_sprites: /path/to/some_dir
The sprites are now available at /sprite/my_images,some_dir.png/ …
Styles
Style Sources
Martin will serve your styles as needed by MapLibre rendering libraries.
To edit these styles, we recommend using https://maputnik.github.io/editor/.
API
Martin can serve MapLibre Style Spec.
Currently, Martin will use any valid JSON file as a style,
but in the future, we may optimise Martin which may result in additional restrictions.
Use the /catalog API to see all the <style_id>s.
Map Style
Use the /style/<style_id> API to get a <style_id>’s JSON content.
Changes or removals of styles are reflected immediately, but additions are not. A restart of Martin is required to see new styles.
Server-side raster tile rendering
Warning
This feature is currently unstable and thus not included in the default build. Its behaviour may change in patch releases.
To experiment with it, install Rust and run
just install-dependencies. With these installed, run the following command to install martin with the unstable feature:cargo build --features=unstable-renderingIt is unstable due to the limitations of our current implementation:
- Rendering support is currently only available on Linux. To add support for macOS/Windows, please see https://github.com/maplibre/maplibre-native-rs.
- Currently, martin does not cache style rendered requests and
- does not support concurrency for this feature.
We welcome contributions to help stabilise this feature!
We support generating a rasterised image for an XYZ tile of a given style.
To do so, you need to enable the feature in the configuration file:
styles:
    rendering: true
After doing so, you can use the /style/<style_id>/{z}/{x}/{y}.{filetype} API to get a <style_id>’s rendered png/jpeg content.
Static image prepraration
We currently do not have the same capabilites as Tileserver-GL to layout images. We are working on adding this feature and are very open to contributions.
Fonts
Font Sources
Martin can serve glyph ranges from otf, ttf, and ttc fonts as needed by MapLibre text rendering. Martin will
generate them dynamically on the fly.
The glyph range generation is cached and the size of this cache can be configured via fonts.cache_size_mb in the config file.
API
Fonts ranges are available either for a single font, or a combination of multiple fonts. The font names are case-sensitive and should match the font name in the font file as published in the catalog. Make sure to URL-escape font names as they usually contain spaces.
| Font Request | |
|---|---|
| Pattern | /font/{name}/{start}-{end} |
| Example | /font/Overpass%20Mono%20Bold/0-255 |
Composite Font Request
When combining multiple fonts, the glyph range will contain glyphs from the first listed font if available, and fallback to the next font if the glyph is not available in the first font, etc. The glyph range will be empty if none of the fonts contain the glyph.
| Composite Font Request with fallbacks | |
|---|---|
| Pattern | /font/{name1},…,{nameN}/{start}-{end} |
| Example | /font/Overpass%20Mono%20Bold,Overpass%20Mono%20Light/0-255 |
Catalog
Martin will show all available fonts at the /catalog endpoint.
curl http://127.0.0.1:3000/catalog
{
  "fonts": {
    "Overpass Mono Bold": {
      "family": "Overpass Mono",
      "style": "Bold",
      "glyphs": 931,
      "start": 0,
      "end": 64258
    },
    "Overpass Mono Light": {
      "family": "Overpass Mono",
      "style": "Light",
      "glyphs": 931,
      "start": 0,
      "end": 64258
    },
    "Overpass Mono SemiBold": {
      "family": "Overpass Mono",
      "style": "SemiBold",
      "glyphs": 931,
      "start": 0,
      "end": 64258
    }
  }
}
Using from CLI
A font file or directory can be configured from the CLI with one or more --font parameters.
martin --font /path/to/font/file.ttf --font /path/to/font_dir
Configuring from Config File
A font directory can be configured from the config file with the fonts key.
# Fonts configuration
fonts:
  # A list of *.otf, *.ttf, and *.ttc font files and dirs to search recursively.
  - /path/to/font/file.ttf
  - /path/to/font_dir
Available API Endpoints
Martin Endpoints
Martin data is available via the HTTP GET endpoints:
| URL | Description |
|---|---|
/ | Web UI |
/catalog | List of all sources |
/{sourceID} | Source TileJSON |
/{sourceID}/{z}/{x}/{y} | Map Tiles |
/{source1},…,{sourceN} | Composite Source TileJSON |
/{source1},…,{sourceN}/{z}/{x}/{y} | Composite Source Tiles |
/sprite/{spriteID}[@2x].{json,png} | Sprite sources |
/sdf_sprite/{spriteID}[@2x].{json,png} | SDF Sprite sources |
/font/{font}/{start}-{end} | Font source |
/font/{font1},…,{fontN}/{start}-{end} | Composite Font source |
/style/{style} | Style source |
/health | Martin server health check: returns 200 OK |
/_/metrics | Martin server Prometheus metrics |
Duplicate Source ID
In case there is more than one source that has the same name, e.g. a PG function is available in two
schemas/connections, or a table has more than one geometry columns, sources will be assigned unique IDs such
as /points, /points.1, etc.
Reserved Source IDs
Some source IDs are reserved for internal use. If you try to use them, they will be automatically renamed to a unique ID
the same way as duplicate source IDs are handled, e.g. a catalog source will become catalog.1.
Some of the reserved IDs: _, catalog, config, font, health, help, index, manifest, metrics, refresh,
reload, sprite, status.
Catalog
A list of all available sources is available via catalogue endpoint:
curl localhost:3000/catalog | jq
{
  "tiles" {
    "function_zxy_query": {
      "name": "public.function_zxy_query",
      "content_type": "application/x-protobuf"
    },
    "points1": {
      "name": "public.points1.geom",
      "content_type": "image/webp"
    },
    ...
  },
  "sprites": {
    "cool_icons": {
      "images": [
        "bicycle",
        "bear",
      ]
    },
    ...
  },
  "fonts": {
    "Noto Mono Regular": {
      "family": "Noto Mono",
      "style": "Regular",
      "glyphs": 875,
      "start": 0,
      "end": 65533
    },
    ...
  },
  "styles": {
    "maplibre_demo": {
      "path": "path/to/maplibre_demo.json",
    },
  },
}
Source TileJSON
All tile sources have a TileJSON endpoint available at the /{SourceID}.
For example, a points function or a table will be available as /points. Composite source combining points
and lines sources will be available at /points,lines endpoint.
curl localhost:3000/points | jq
curl localhost:3000/points,lines | jq
Guides
This section of the docs’ site is dedicated to some examples and tutorials. If you have something you would like to share with the community that is not straightforward and might be beneficial to others, this is the place!
The process of adding examples or guides is pretty straightforward, see our docs folder in the Martin repository for more information.
Map renderer specific
Martin is mostly a general purpose tileserver. It can thus be used in conjunction with renderers that are not maplibre.
Warning
Style serving, as it is specific to maplibre.
MapLibre
Using with MapLibre
MapLibre is an Open-source JavaScript library for showing maps on a website. MapLibre can accept MVT vector tiles generated by Martin, and applies a style to them to draw a map using Web GL.
You can add a layer to the map and specify Martin TileJSON endpoint as a
vector source URL. You should also specify a source-layer property. For Table Sources it
is {table_name} by default.
map.addLayer({
    id: 'points',
    type: 'circle',
    source: {
        type: 'vector',
        url: 'http://localhost:3000/points'
    },
    'source-layer': 'points',
    paint: {
        'circle-color': 'red'
    },
});
map.addSource('rpc', {
    type: 'vector',
    url: `http://localhost:3000/function_zxy_query`
});
map.addLayer({
    id: 'points',
    type: 'circle',
    source: 'rpc',
    'source-layer': 'function_zxy_query',
    paint: {
        'circle-color': 'blue'
    },
});
You can also combine multiple sources into one source with Composite Sources. Each source in a
composite source can be accessed with its {source_name} as a source-layer property.
map.addSource('points', {
    type: 'vector',
    url: `http://0.0.0.0:3000/points1,points2`
});

map.addLayer({
    id: 'red_points',
    type: 'circle',
    source: 'points',
    'source-layer': 'points1',
    paint: {
        'circle-color': 'red'
    }
});

map.addLayer({
    id: 'blue_points',
    type: 'circle',
    source: 'points',
    'source-layer': 'points2',
    paint: {
        'circle-color': 'blue'
    }
});
Leaflet
Using with Leaflet
Leaflet is the leading open-source JavaScript library for mobile-friendly interactive maps.
You can add vector tiles using Leaflet.VectorGrid plugin. You must initialize a VectorGrid.Protobuf with a URL template, just like in L.TileLayers. The difference is that you should define the styling for all the features.
L.vectorGrid
  .protobuf('http://localhost:3000/points/{z}/{x}/{y}', {
    vectorTileLayerStyles: {
      'points': {
        color: 'red',
        fill: true
      }
    }
  })
  .addTo(map);
deck.gl
Using with deck.gl
deck.gl is a WebGL-powered framework for visual exploratory data analysis of large datasets.
You can add vector tiles using MVTLayer. MVTLayer data property defines the remote data for the MVT layer. It can be
String: Either a URL template or a TileJSON URL.Array: an array of URL templates. It allows to balance the requests across different tile endpoints. For example, if you define an array with 4 urls and 16 tiles need to be loaded, each endpoint is responsible to server 16/4 tiles.JSON: A valid TileJSON object.
const pointsLayer = new MVTLayer({
  data: 'http://localhost:3000/points',
  pointRadiusUnits: 'pixels',
  getRadius: 5,
  getFillColor: [230, 0, 0]
});

const deckgl = new DeckGL({
  container: 'map',
  mapStyle: 'https://basemaps.cartocdn.com/gl/dark-matter-gl-style/style.json',
  initialViewState: {
    latitude: 0,
    longitude: 0,
    zoom: 1
  },
  layers: [pointsLayer]
});
Mapbox
Using with Mapbox
Mapbox GL JS is a JavaScript library for interactive, customizable vector maps on the web. Mapbox GL JS v1.x was open source, and it was forked as MapLibre, so using Martin with Mapbox is similar to MapLibre. Mapbox GL JS can accept MVT vector tiles generated by Martin, and applies a style to them to draw a map using Web GL.
You can add a layer to the map and specify Martin TileJSON endpoint as a vector source URL.
You should also specify a source-layer property.
For Table Sources it is {table_name} by default.
map.addLayer({
    id: 'points',
    type: 'circle',
    source: {
        type: 'vector',
        url: 'http://localhost:3000/points'
    },
    'source-layer': 'points',
    paint: {
        'circle-color': 'red'
    }
});
OpenLayers
Using with OpenLayers
OpenLayers is an open source library for creating interactive maps on the web. Similar to MapLibre GL JS, it can also display image and vector map tiles served by Martin Tile Server.
You can integrate tile services from martin and OpenLayers with its VectorTileLayer. Here is an example to add MixPoints vector tile source to an OpenLayers map.
const layer = new VectorTileLayer({
    source: new VectorTileSource({
        format: new MVT(),
        url: 'http://0.0.0.0:3000/MixPoints/{z}/{x}/{y}',
        maxZoom: 14,
    }),
});
map.addLayer(layer);
Tile source specific
Some sources for tiles are harder to setup than others. Below, we provide setup instructions for some common data sources:
Hosted PostgreSQL
Some providers of PostgreSQL databases require additional configuration to work with Martin. We try to provide a guide for each provider, but we may not cover all of them.
Using with DigitalOcean PostgreSQL
You can use Martin with Managed PostgreSQL from DigitalOcean with PostGIS extension
First, you need to download the CA certificate and get your cluster connection string from the dashboard. After that, you can use the connection string and the CA certificate to connect to the database
martin --ca-root-file ./ca-certificate.crt \
       postgres://user:password@host:port/db?sslmode=require
Using with Heroku PostgreSQL
You can use Martin with Managed PostgreSQL from Heroku with the PostGIS extension
heroku pg:psql -a APP_NAME -c 'create extension postgis'
Use the same environment variables as Heroku suggests for psql.
export DATABASE_URL=$(heroku config:get DATABASE_URL -a APP_NAME)
export PGSSLCERT=DIRECTORY/PREFIXpostgresql.crt
export PGSSLKEY=DIRECTORY/PREFIXpostgresql.key
export PGSSLROOTCERT=DIRECTORY/PREFIXroot.crt

martin
You may also be able to validate SSL certificate with an explicit sslmode, e.g.
export DATABASE_URL="$(heroku config:get DATABASE_URL -a APP_NAME)?sslmode=verify-ca"
Setting up a Basemap and Overlaying Points from PostGIS
You commonly have some semi-proprietary datasource which you want to overlay onto another. This guide shows how to generate a basemap using Planetiler from OSM and overlay custom points from a PostGIS database. See here for a discussion on the pros and cons of this/alternative data sources.
Prerequisites
We expect you have the following already installed:
Generate an MBTiles basemap with Planetiler
There are multiple ways to generate a tile archive. For semi-static tile archives, we think using Planetiler to build MBtiles archives using OpenMapTiles is a good starting point.
🤔 Why do I need a tool to convert OSM to mbtiles in the first place? (click to expand)
The reason you need a tool to build vector tilesets from OpenStreetMap is that the data in OpenStreetMap is
- not following a specific schema,
- nor pre-tiled into
x/y/zchunks.
🤔 What is up with MBtiles and OpenMapTiles (click to expand)
Good question.
MBtiles is the archive format. Think of a sqlite database storing the data you need a chunk (x/y/z) of the world.
See our comparison pmtiles vs. mbtiles for discussions on the pros and cons of this/alternative formats.
But how does the data in the archive look like?
This is where the vector tile schema comes in:
OpenMapTiles defines which layers are included in the served data and how they are aggregated.
OpenMapTiles does have an attribution requirement. You will need to have © OpenMapTiles at the bottom of your map.
See Shortbread for a newer, but less mature alternative if you want to read more.
Below command downloads a tile archive at data/monaco.mbtiles for monaco.
Please refer to Planetilers documentation on different download options.
mkdir --parents data
docker run \
  --user=$UID \
  -e JAVA_TOOL_OPTIONS="-Xmx1g" \
  -v "$(pwd)/data":/data \
  --rm \
  ghcr.io/onthegomap/planetiler:latest \
  --download \
  --minzoom=0 \
  --maxzoom=14 \
  --tile_compression=none \
  --area=monaco \
  --output /data/monaco.mbtiles
Loading data into a PostGIS database
Run PostGIS
First, you need a running postGIS instance.
docker run \
  --name some-postgis \
  --env POSTGRES_PASSWORD=mypass \
  --publish 5432:5432 \
  --detach \
  postgis/postgis
Import Points into PostGIS
Then you need to add geometries to the PostGIS database.
This is possible via multiple ways, such as osm2pgsql for adding specific, updatable OSM data or in the programming language of your choice via postgres’ various database connectors.
docker exec some-postgis psql --dbname postgres --username postgres --command \
  "CREATE TABLE where_yachts_can_be_looked_at ("\
  "  title TEXT NOT NULL, "\
  "  subtitle TEXT NOT NULL, "\
  "  location GEOMETRY(Point, 4326) NOT NULL);"

docker exec some-postgis psql --dbname postgres --username postgres --command \
  "INSERT INTO where_yachts_can_be_looked_at (title, subtitle, location) VALUES ( "\
  "  'Port Hercules', "\
  "  'Great view of superyachts docked in the iconic harbor.', "\
  "  ST_SetSRID(ST_MakePoint(7.424789, 43.735217), 4326));"
Serving tiles with Martin
Now we will serve the content of mbtiles and the postgis database.
If you want more precise options what things are published how, please see the configuration file or cli documentation. By default, we will share every servable postgres table, view and function.
martin data/monaco.mbtiles postgres://postgres:mypass@localhost:5432/postgres
You can now see the catalog of available things here: http://localhost:3000/catalog
The tilejson endpoint of both tilesets is http://localhost:3000/monaco,where_yachts_can_be_looked_at
Using in Maputnik to style a map
Due to CORS, we CANNOT use the website https://maplibre.org/maputnik/ without further setup. Once the tiles are deployed behind https, this can be used.
To get a local version of maputnik, run
docker run -it --rm -p 8888:80 ghcr.io/maplibre/maputnik:main
Maputnik is now online, so lets load martins tiles into it.
- Visit
http://localhost:8888 - You first need a style:
- Click
Open
- Select a style you like (we are going to choose
Maptiler Basic)
- Click
- You now have a style using Maptilers’ (NOT martins) data. You need to change its datasource to use the tiles we just published:
- Click
Data Sources
- And add the tilejson from above
http://localhost:3000/monaco,where_yachts_can_be_looked_at:
- Click
- Now, lets zoom into monaco:
- And finally, lets add a circle layer for our yachts:
-
Click
Add Layer
-
Configure the layer as follows:
-
And style it as:
json configuration (click to expand)
{
  "id": "where_yachts_can_be_looked_at",
  "type": "circle",
  "source": "openmaptiles",
  "source-layer": "where_yachts_can_be_looked_at",
  "paint": {
    "circle-color": "rgba(255, 7, 103, 1)",
    "circle-blur": 0.2,
    "circle-radius": {
      "stops": [
        [13, 1],
        [15, 300],
        [20, 2000]
      ]
    },
    "circle-opacity": {
      "stops": [[13.5, 0], [14, 0.4]]
    }
  },
  "minzoom": 13
}
-
PostgreSQL SSL Certificates
Martin supports SSL certificate authentication for PostgreSQL connections. This guide covers certificate generation, PostgreSQL configuration, and Martin setup.
When to Use SSL Certificates
Use SSL certificates for:
- Deployments where martin and Postgis are on separate machines
- Compliance requirements (PCI DSS, HIPAA, etc.)
- Cloud PostgreSQL deployments
- High-security environments requiring certificate-based authentication
SSL Modes
| sslmode | Eaves- dropping protection | MITM protection | Statement |
|---|---|---|---|
disable | ⛔ | ⛔ | I don’t care about security, and I don’t want to pay the overhead of encryption. |
allow | 🤷 | ⛔ | I don’t care about security, but I will pay the overhead of encryption if the server insists on it. |
prefer | 🤷 | ⛔ | I don’t care about encryption, but I wish to pay the overhead of encryption if the server supports it. |
require | ✅ | ⛔ | I want my data to be encrypted, and I accept the overhead. I trust that the network will make sure I always connect to the server I want. |
verify-ca | ✅ | Depends on CA policy | I want my data encrypted, and I accept the overhead. I want to be sure that I connect to a server that I trust. |
verify-full | ✅ | ✅ | I want my data encrypted, and I accept the overhead. I want to be sure that I connect to a server I trust, and that it’s the one I specify. |
Our recommendation: verify-full or allow.
There are not many cases where anything in between makes sense.
In particular, the default mode (prefer) does not make much sense.
From the postgres documentation:
As is shown in the table, this makes no sense from a security point of view, and it only promises performance overhead if possible. It is only provided as the default for backward compatibility, and is not recommended in secure deployments.
For a fuller explanation of the different tradeoffs, refer to the PostgreSQL SSL Certificates documentation.
Generating Certificates
For basic SSL encryption, you need:
server-cert.pem- PostgreSQL server certificateserver-key.pem- PostgreSQL server private keyca-cert.pem- Certificate Authority certificate
┌─────────────────┐    SSL/TLS     ┌─────────────────┐
│     Martin      │◄─────────────►│   PostgreSQL    │
└─────────────────┘   verify-full  └─────────────────┘
         │                                   │
    ┌─────────┐                        ┌─────────────┐
    │ CA Cert │                        │ Server Cert │
    │         │                        │ Server Key  │
    └─────────┘                        └─────────────┘
Self-Signed Certificates
To generate certificates as a CA, you will need a private key. To verify the certificate, you will need the CA certificate.
# Generate CA private key
openssl genrsa -out ca-key.pem 3072

# Generate CA certificate
openssl req -new -x509 -days 365 -key ca-key.pem -out ca-cert.pem \
    -subj "/C=US/ST=State/L=City/O=Organization/CN=Test CA"
You can then generate a server certificates:
# Generate server private key
openssl genrsa -out server-key.pem 3072

# Generate server certificate signing request with SAN extension
openssl req -new -key server-key.pem -out server-csr.pem \
    -subj "/C=US/ST=State/L=City/O=Organization/CN=localhost" \
    -addext "subjectAltName = DNS:localhost"

# Generate server certificate signed by CA with SAN extension
openssl x509 -req -days 365 -in server-csr.pem \
    -CA ca-cert.pem -CAkey ca-key.pem \
    -CAcreateserial -out server-cert.pem -extensions v3_req \
    -extfile <(printf "[v3_req]\nsubjectAltName = DNS:localhost")

# Set permissions
chmod 400 *-key.pem
chmod 444 *-cert.pem ca-cert.pem
Production Certificates
For production, use certificates from:
- Regular Certificate Authorities (Let’s Encrypt, DigiCert, GlobalSign)
- Cloud provider managed Certificate Authorities
- Organization-Internal Certificate Authority
PostgreSQL Configuration
services:
  db:
    image: postgis/postgis:17-3.5
    environment:
      POSTGRES_USER: postgres
      POSTGRES_PASSWORD: password
    ports:
      - "5432:5432"
    volumes:
      - ./server-cert.pem:/var/lib/postgresql/server.crt:ro
      - ./server-key.pem:/var/lib/postgresql/server.key:ro
    command:
      - -c
      - ssl=on
      - -c
      - ssl_cert_file=/var/lib/postgresql/server.crt
      - -c
      - ssl_key_file=/var/lib/postgresql/server.key
docker compose up
Tip
Postgres requires specific file permissions and ownership for SSL certificates. In docker this can be a bit tricky:
alpine images have
70:70as the defaultuser:groupdebian images have999:999as the defaultuser:groupYou can change this by running the following commands:
chown 999:999 *.pem
chmod 400 *.pem
Testing with psql
Test SSL Connection via
export PGSSLROOTCERT=ca-cert.pem
psql "postgres://postgres:password@localhost:5432/postgres?sslmode=verify-full"
Tip
If you get file permission errors, make sure the current user can access the files. The previous step may set them to not readable by the current user.
Then, verify SSL Status by
-- Enable SSL info extension (required for ssl_is_used function)
CREATE EXTENSION IF NOT EXISTS sslinfo;

-- Check SSL status
SELECT ssl_is_used();

-- SSL connection details
SELECT * FROM pg_stat_ssl WHERE pid = pg_backend_pid();
Martin Configuration
Martin can be configured using environment variables, the CLI, or the configuration file. Which of them you choose is up to you. You do not need to configure things twice.
Environment Variables (click to expand)
export PGSSLROOTCERT=./ca-cert.pem
export DATABASE_URL="postgres://postgres:password@localhost:5432/postgres?sslmode=verify-full"
martin
Configuration File (click to expand)
postgres:
  ssl_root_cert: './ca-cert.pem'
  connection_string: 'postgres://postgres:password@localhost:5432/postgres?sslmode=verify-full'
Command Line (click to expand)
martin --ca-root-file ./ca-cert.pem \
      "postgres://postgres:password@localhost:5432/postgres?sslmode=verify-full"
Troubleshooting
You can get more context via the following commands:
export PGSSLMODE=verify-full
export PGSSLROOTCERT=./ca-cert.pem
# Verbose psql
psql -h localhost -U postgres -d postgres -v

# Debug Martin
RUST_LOG=debug RUST_LOG_FORMAT=pretty martin postgres://...
These are the errors that can occur:
Certificate verification failed (click to expand)
- Check server certificate is signed by the CA
- Verify CA certificate path in
PGSSLROOTCERT - Ensure certificate files are readable
Hostname verification failed (click to expand)
- Server certificate CN/SAN must match hostname
- Use
verify-cainstead ofverify-fullif hostname doesn’t match
Permission denied (click to expand)
- Check certificate file permissions
- Private keys should be
chmod 400and readable by the user running the application
Connection refused (click to expand)
- Verify PostgreSQL accepts SSL connections
- Check
pg_hba.confallows SSL from your IP
Security Best Practices if using postgres via SSL
- Use at least 3072-bit RSA keys
- Protect private keys with restricted permissions (
chmod 400) - Rotate certificates before expiration
- Use
verify-fullin production - Monitor certificate expiration
- Store
ca-key.pemsecurely (only needed for certificate management) - Use secure secret management for production certificates
Generating Tiles in Bulk
We offer the martin-cp tool for generating tiles in bulk, from any source(s) supported by Martin, and save retrieved tiles into a new or an existing MBTiles file.
martin-cp can be used to generate tiles for a large area or multiple areas (bounding boxes).
If multiple areas overlap, it will ensure each tile is generated only once
martin-cp supports the same configuration file and CLI arguments as Martin server, so it can support all sources and even combining sources.
After copying, martin-cp will update the agg_tiles_hash metadata value unless --skip-agg-tiles-hash is specified.
This allows the MBTiles file to be validated using mbtiles validate command.
Usage
This copies tiles from a PostGIS table my_table into an MBTiles file tileset.mbtiles using normalized schema, with zoom levels from 0 to 10, and xyz-compliant tile bounds of the whole world.
martin-cp  --output-file tileset.mbtiles                         \
           --mbtiles-type normalized                             \
           "--bbox=-180,-85.05112877980659,180,85.0511287798066" \
           --min-zoom 0                                          \
           --max-zoom 10                                         \
           --source source_name                                  \
           postgres://postgres@localhost:5432/db
Tip
Next to regular sorces,
--source <SOURCE>does support composite sources. This meansmartin-cpcan be used to merge two different sources into onembtilesarchive.
If performance is a concern, you should also consider
Tip
--concurrency <CONCURRENCY>and--pool-size <POOL_SIZE>can be used to control the number of concurrent requests and the pool size for postgres sources respectively.The optimal setting depends on:
- the source(s) performance characteristics
- how much load is allowed, for example in a multi-tenant environment
- how to compress tiles stored in the output file
You should also consider
Tip
--encoding <ENCODING>can be used to reduce the final size of the MBTiles file or decrease the amount of processingmartin-cpdoes.The default
gzipshould be a reasonable choice for most use cases, but if you prefer a different encoding, you can specify it here. If set to multiple values like'gzip,br',martin-cpwill use the first encoding, or re-encode if the tile is already encoded and that encoding is not listed. Useidentityto disable compression. Ignored for non-encodable tiles like PNG and JPEG.
Arguments
Use martin-cp --help to see a list of available options:
A tool to bulk copy tiles from any Martin-supported sources into an mbtiles file

Usage: martin-cp [OPTIONS] --output-file <OUTPUT_FILE> [CONNECTION]...

Arguments:
  [CONNECTION]...
          Connection strings, e.g. postgres://... or /path/to/files

Options:
  -s, --source <SOURCE>
          Name of the source to copy from. Not required if there is only one source

  -o, --output-file <OUTPUT_FILE>
          Path to the mbtiles file to copy to

      --mbtiles-type <SCHEMA>
          Output format of the new destination file. Ignored if the file exists. [DEFAULT: normalized]

          [possible values: flat, flat-with-hash, normalized]

      --url-query <URL_QUERY>
          Optional query parameter (in URL query format) for the sources that support it (e.g. Postgres functions).

      --encoding <ENCODING>
          Optional accepted encoding parameter as if the browser sent it in the HTTP request.

          If set to multiple values like gzip,br, martin-cp will use the first encoding, or re-encode if the tile is already encoded and that encoding is not listed. Use identity to disable compression. Ignored for non-encodable tiles like PNG and JPEG.

          [default: gzip]

      --on-duplicate <ON_DUPLICATE>
          Allow copying to existing files, and indicate what to do if a tile with the same Z/X/Y already exists.

          [possible values: override, ignore, abort]

      --concurrency <CONCURRENCY>
          Number of concurrent connections to use

          [default: 1]

      --bbox <BBOX>
          Bounds to copy, in the format min_lon,min_lat,max_lon,max_lat. Can be specified multiple times with overlapping bounds being handled correctly. Maximum bounds follows mbtiles specification for xyz-compliant tile bounds

          If omitted, will first default to configured source bounds if present. Otherwise, will default to global xyz-compliant tile bounds.

          [default: -180,-85.05112877980659,180,85.0511287798066]

      --min-zoom <MIN_ZOOM>
          Minimum zoom level to copy

      --max-zoom <MAX_ZOOM>
          Maximum zoom level to copy

  -z, --zoom-levels <ZOOM_LEVELS>
          List of zoom levels to copy

      --skip-agg-tiles-hash
          Skip generating a global hash for mbtiles validation. By default, martin-cp will compute and update agg_tiles_hash metadata value

      --set-meta <KEY=VALUE>
          Set additional metadata values. Must be set as "key=value" pairs. Can be specified multiple times

  -c, --config <CONFIG>
          Path to config file. If set, no tile source-related parameters are allowed

      --save-config <SAVE_CONFIG>
          Save resulting config to a file or use "-" to print to stdout. By default, only print if sources are auto-detected

  -b, --auto-bounds <AUTO_BOUNDS>
          Specify how bounds should be computed for the spatial PG tables. [DEFAULT: quick]

          Possible values:
          - quick: Compute table geometry bounds, but abort if it takes longer than 5 seconds
          - calc:  Compute table geometry bounds. The startup time may be significant. Make sure all GEO columns have indexes
          - skip:  Skip bounds calculation. The bounds will be set to the whole world

      --ca-root-file <CA_ROOT_FILE>
          Loads trusted root certificates from a file. The file should contain a sequence of PEM-formatted CA certificates

  -d, --default-srid <DEFAULT_SRID>
          If a spatial PG table has SRID 0, then this default SRID will be used as a fallback

  -p, --pool-size <POOL_SIZE>
          Maximum Postgres connections pool size [DEFAULT: 20]

  -m, --max-feature-count <MAX_FEATURE_COUNT>
          Limit the number of geo features per tile.

          If the source table has more features than set here, they will not be included in the tile and the result will look "cut off"/incomplete. This feature allows to put a maximum latency bound on tiles with extreme amount of detail at the cost of
          not returning all data. It is sensible to set this limit if you have user generated/untrusted geodata, e.g. a lot of data points at Null Island.

          Can be either a positive integer or unlimited if omitted.

  -h, --help
          Print help (see a summary with '-h')

  -V, --version
          Print version

Use RUST_LOG environment variable to control logging level, e.g. RUST_LOG=debug or RUST_LOG=martin_cp=debug. See https://docs.rs/env_logger/latest/env_logger/index.html#enabling-logging for more information.
Working with MBTiles archives
Martin includes mbtiles utility to interact with the *.mbtiles files from the command line.
It allows users to examine, copy, validate or compare and apply diffs between them.
This tool can be installed by compiling the latest released version with cargo install mbtiles --locked, or by downloading a pre-built binary from the releases page.
Use mbtiles --help to see a list of available commands:
A utility to work with .mbtiles file content

Usage: mbtiles <COMMAND>

Commands:
  summary      Show MBTiles file summary statistics
  meta-all     Prints all values in the metadata table in a free-style, unstable YAML format
  meta-get     Gets a single value from the MBTiles metadata table
  meta-set     Sets a single value in the MBTiles metadata table or deletes it if no value
  diff         Compare two files A and B, and generate a new diff file. If the diff file is applied to A, it will produce B
  copy         Copy tiles from one mbtiles file to another
  apply-patch  Apply diff file generated from 'copy' command
  meta-update  Update metadata to match the content of the file
  validate     Validate tile data if hash of tile data exists in file
  help         Print this message or the help of the given subcommand(s)

Options:
  -h, --help     Print help
  -V, --version  Print version

Use RUST_LOG environment variable to control logging level, e.g. RUST_LOG=debug or RUST_LOG=mbtiles=debug. See https://docs.rs/env_logger/latest/env_logger/index.html#enabling-logging for more information.
And mbtiles <command> --help to see help for a specific command.
Example for mbtiles validate --help:
Validate tile data if hash of tile data exists in file

Usage: mbtiles validate [OPTIONS] <FILE>

Arguments:
  <FILE>
          MBTiles file to validate

Options:
      --integrity-check <INTEGRITY_CHECK>
          Value to specify the extent of the SQLite integrity check performed

          [default: quick]
          [possible values: quick, full, off]

      --agg-hash <AGG_HASH>
          How should the aggregate tiles hash be checked or updated

          Possible values:
          - verify: Verify that the aggregate tiles hash value in the metadata table matches the computed value. Used by default
          - update: Update the aggregate tiles hash value in the metadata table
          - off:    Do not check the aggregate tiles hash value

  -h, --help
          Print help (see a summary with '-h')
MBTiles Schemas
The mbtiles tool builds on top of the original MBTiles specification by specifying three different kinds of schema for tiles data: flat, flat-with-hash, and normalized. The mbtiles tool can convert between these schemas, and can also generate a diff between two files of any schemas, as well as merge multiple schema files into one file.
flat
Flat schema is the closest to the original MBTiles specification. It stores all tiles in a single table. This schema is the most efficient when the tileset contains no duplicate tiles.
CREATE TABLE tiles (
    zoom_level INTEGER,
    tile_column INTEGER,
    tile_row INTEGER,
    tile_data BLOB
);

CREATE UNIQUE INDEX tile_index ON tiles (
    zoom_level, tile_column, tile_row
);
flat-with-hash
Similar to the flat schema, but also includes a tile_hash column that contains a hash value of the tile_data column. Use this schema when the tileset has no duplicate tiles, but you still want to be able to validate the content of each tile individually.
CREATE TABLE tiles_with_hash (
    zoom_level INTEGER NOT NULL,
    tile_column INTEGER NOT NULL,
    tile_row INTEGER NOT NULL,
    tile_data BLOB,
    tile_hash TEXT
);

CREATE UNIQUE INDEX tiles_with_hash_index ON tiles_with_hash (
    zoom_level, tile_column, tile_row
);

CREATE VIEW tiles AS
SELECT
    zoom_level,
    tile_column,
    tile_row,
    tile_data
FROM tiles_with_hash;
normalized
Normalized schema is the most efficient when the tileset contains duplicate tiles. It stores all tile blobs in the images table, and stores the tile Z,X,Y coordinates in a map table. The map table contains a tile_id column that is a foreign key to the images table. The tile_id column is a hash of the tile_data column, making it possible to both validate each individual tile like in the flat-with-hash schema, and also to optimize storage by storing each unique tile only once.
CREATE TABLE map (
    zoom_level INTEGER,
    tile_column INTEGER,
    tile_row INTEGER,
    tile_id TEXT
);

CREATE TABLE images (
    tile_id TEXT,
    tile_data BLOB
);

CREATE UNIQUE INDEX map_index ON map (
    zoom_level, tile_column, tile_row
);
CREATE UNIQUE INDEX images_id ON images (
    tile_id
);

CREATE VIEW tiles AS
SELECT
    map.zoom_level,
    map.tile_column,
    map.tile_row,
    images.tile_data
FROM
    map INNER JOIN images
    ON map.tile_id = images.tile_id;

CREATE VIEW tiles_with_hash AS
SELECT
    map.zoom_level,
    map.tile_column,
    map.tile_row,
    images.tile_data,
    images.tile_id AS tile_hash
FROM
    map INNER JOIN images
    ON map.tile_id = images.tile_id;
Optionally, .mbtiles files with normalized schema can include a tiles_with_hash view. All normalized files created by the mbtiles tool will contain this view.
FROM
    map INNER JOIN images
    ON map.tile_id = images.tile_id;

CREATE VIEW tiles_with_hash AS
SELECT
    map.zoom_level,
    map.tile_column,
    map.tile_row,
    images.tile_data,
    images.tile_id AS tile_hash
FROM
    map INNER JOIN images
    ON map.tile_id = images.tile_id;
MBTiles information and metadata
summary
Use mbtiles summary to get a summary of the contents of an MBTiles file. The command will print a table with the
number of tiles per zoom level, the size of the smallest and largest tiles, and the average size of tiles at each zoom
level. The command will also print the bounding box of the covered area per zoom level.
# Create a sample .mbtiles file in some dir
sqlite3 target/world_cities.mbtiles < tests/fixtures/mbtiles/world_cities.sql
# Get mbtiles summary
mbtiles summary target/world_cities.mbtiles

MBTiles file summary for tests/fixtures/mbtiles/world_cities.mbtiles
Schema: flat
File size: 48.00kB
Page size: 4.00kB
Page count: 12

 Zoom |   Count   | Smallest  |  Largest  |  Average  | Bounding Box
    0 |         1 |     1.0kB |     1.0kB |    1.0kB | -180,-85,180,85
    1 |         4 |      160B |      650B |      366B | -180,-85,180,85
    2 |         7 |      137B |      495B |      239B | -180,-67,180,67
    3 |        17 |       67B |      246B |      134B | -135,-41,180,67
    4 |        38 |       64B |      175B |       86B | -135,-41,180,67
    5 |        57 |       64B |      107B |       72B | -124,-41,180,62
    6 |        72 |       64B |       97B |       68B | -124,-41,180,62
  all |       196 |       64B |     1.0kB |       96B | -180,-85,180,85
meta-all
Print all metadata values to stdout, as well as the results of tile detection. The format of the values printed is not stable, and should only be used for visual inspection.
mbtiles meta-all my_file.mbtiles
meta-get
Retrieve raw metadata value by its name. The value is printed to stdout without any modifications. For example, to get
the description value from an mbtiles file:
mbtiles meta-get my_file.mbtiles description
meta-set
Set metadata value by its name, or delete the key if no value is supplied. For example, to set the description value
to A vector tile dataset:
mbtiles meta-set my_file.mbtiles description "A vector tile dataset"
Copying, Diffing, and Patching MBTiles
mbtiles copy
Copy command copies an mbtiles file, optionally filtering its content by zoom levels.
mbtiles copy src_file.mbtiles dst_file.mbtiles \
        --min-zoom 0 --max-zoom 10
This command can also be used to generate files of different supported schema.
mbtiles copy normalized.mbtiles dst.mbtiles \
         --dst-type flat-with-hash
mbtiles copy --diff-with-file
This option is identical to using mbtiles diff .... The following commands two are equivalent:
mbtiles diff file1.mbtiles file2.mbtiles diff.mbtiles

mbtiles copy file1.mbtiles diff.mbtiles \
        --diff-with-file file2.mbtiles
mbtiles copy --apply-patch
Copy a source file to destination while also applying the diff file generated by copy --diff-with-file command above
to the destination mbtiles file. This allows safer application of the diff file, as the source file is not modified.
mbtiles copy src_file.mbtiles dst_file.mbtiles \
        --apply-patch diff.mbtiles
Diffing MBTiles
mbtiles diff
Copy command can also be used to compare two mbtiles files and generate a delta (diff) file. The diff file can
be applied to the src_file.mbtiles elsewhere, to avoid copying/transmitting the entire
modified dataset. The delta file will contain all tiles that are different between the two files (modifications,
insertions, and deletions as NULL values), for both the tile and metadata tables.
# This command will compare `file1.mbtiles` and `file2.mbtiles`,
# and generate a new diff file `diff.mbtiles`.
mbtiles diff file1.mbtiles file2.mbtiles diff.mbtiles

# If diff.mbtiles is applied to file1.mbtiles, it will produce file2.mbtiles
mbtiles apply-patch file1.mbtiles diff.mbtiles file2a.mbtiles

# file2.mbtiles and file2a.mbtiles should now be the same
# Validate both files and see that their hash values are identical
mbtiles validate file2.mbtiles
[INFO ] The agg_tiles_hashes=E95C1081447FB25674DCC1EB97F60C26 has been verified for file2.mbtiles

mbtiles validate file2a.mbtiles
[INFO ] The agg_tiles_hashes=E95C1081447FB25674DCC1EB97F60C26 has been verified for file2a.mbtiles
Delta file metadata
All metadata from file2.mbtiles will be copied to the diff file.
There are two exceptions to this. The first is that the agg_tiles_hash value will be renamed to agg_tiles_hash_after_apply. A
new agg_tiles_hash will be generated for the diff file itself. This is done to avoid confusion when applying the diff
file to the original file, as the agg_tiles_hash value will be different after the diff is applied. The apply-patch
command will automatically rename the agg_tiles_hash_after_apply value back to agg_tiles_hash when applying the
diff.
The second exception is that a new metadata value agg_tiles_hash_before_apply will be added to the diff file, which contains the
agg_tiles_hash value from file1.mbtiles. This will be used to verify that the diff file is being applied to the correct source file.
mbtiles apply-patch
Apply the diff file generated with the mbtiles diff command above to an MBTiles file. The diff file can be applied to
the src_file.mbtiles that has been previously downloaded to avoid copying/transmitting the entire modified dataset
again. The src_file.mbtiles will modified in-place. It is also possible to apply the diff file while copying the
source file to a new destination file, by using
the mbtiles copy --apply-patch command.
Note that the agg_tiles_hash_after_apply metadata value will be renamed to agg_tiles_hash when applying the diff.
This is done to avoid confusion when applying the diff file to the original file, as the agg_tiles_hash value will be
different after the diff is applied.
mbtiles apply-patch src_file.mbtiles diff_file.mbtiles
Applying diff with SQLite
Another way to apply the diff is to use the sqlite3 command line tool directly. This SQL will delete all tiles
from src_file.mbtiles that are set to NULL in diff_file.mbtiles, and then insert or update all new tiles
from diff_file.mbtiles into src_file.mbtiles, where both files are of flat type. The name of the diff file is
passed as a query parameter to the sqlite3 command line tool, and then used in the SQL statements. Note that this does
not update the agg_tiles_hash metadata value, so it will be incorrect after the diff is applied.
sqlite3 src_file.mbtiles \
  -bail \
  -cmd ".parameter set @diffDbFilename diff_file.mbtiles "\
  "ATTACH DATABASE @diffDbFilename AS diffDb; "\
  "DELETE FROM tiles "\
  "  WHERE (zoom_level, tile_column, tile_row) IN ( "\
  "    SELECT zoom_level, tile_column, tile_row "\
  "    FROM diffDb.tiles "\
  "    WHERE tile_data ISNULL); "\
  "INSERT OR REPLACE INTO tiles (zoom_level, tile_column, tile_row, tile_data) "\
  "  SELECT * FROM diffDb.tiles WHERE tile_data NOTNULL;"
MBTiles Validation
The original MBTiles specification does not provide any guarantees for
the content of the tile data in MBTiles. mbtiles validate assumes a few additional conventions and uses them to ensure
that the content of the tile data is valid performing several validation steps. If the file is not valid, the command
will print an error message and exit with a non-zero exit code.
mbtiles validate src_file.mbtiles
SQLite Integrity check
The validate command will run PRAGMA integrity_check on the file, and will fail if the result is not ok.
The --integrity-check flag can be used to disable this check, or to make it more thorough with full value. Default
is quick.
Schema check
The validate command will verify that the tiles table/view exists, and that it has the expected columns and indexes.
It will also verify that the metadata table/view exists, and that it has the expected columns and indexes.
Per-tile validation
If the .mbtiles file uses flat_with_hash
or normalized schema, the validate command will verify that the MD5 hash of
the tile_data column matches the tile_hash or tile_id columns (depending on the schema).
A typical Normalized schema generated by tools like tilelive-copy
use MD5 hash in the tile_id column. The Martin’s mbtiles tool can use this hash to verify the content of each tile.
We also define a new flat-with-hash schema that stores the hash and tile data in the
same table, allowing per-tile validation without the multiple table layout.
Per-tile validation is not available for the flat schema, and will be skipped.
Aggregate Content Validation
Per-tile validation will catch individual tile corruption, but it will not detect overall datastore corruption such as
missing tiles, tiles that should not exist, or tiles with incorrect z/x/y values. For that, the mbtiles tool defines a
new metadata value called agg_tiles_hash.
The value is computed by hashing the combined value for all rows in the tiles table/view, ordered by z,x,y. The value
is computed using the following SQL expression, which uses a custom md5_concat_hex function
from sqlite-hashes crate:
md5_concat_hex(
    CAST(zoom_level  AS TEXT),
    CAST(tile_column AS TEXT),
    CAST(tile_row    AS TEXT),
    tile_data)
In case there are no rows or all are NULL, the hash value of an empty string is used. Note that SQLite allows any value
type to be stored as in any column, so if tile_data accidentally contains non-blob/text/null value, validation will
fail.
The mbtiles tool will compute agg_tiles_hash value when copying or validating mbtiles files. Use --agg-hash update
to force the value to be updated, even if it is incorrect or does not exist.
Architecture
This document provides a high-level overview of Martin’s architecture, describing its major components, how they interact, and the rationale behind key design decisions.
Overview
Martin is a blazing fast tile server written in Rust that generates and serves vector tiles on the fly from multiple data sources. It is designed to handle heavy traffic and optimize for speed while maintaining a clean separation of concerns.
Core Components
Martin’s architecture is organized into four main Rust crates, each with distinct responsibilities:
Purpose: The main tile server binary and HTTP service layer.
Location: /martin
Key Responsibilities:
- HTTP server using Actix-Web framework
- Request routing and endpoint handling
- Configuration parsing (CLI args, env vars, config files)
- Tile source discovery and initialization
- Serving the Web UI for tile inspection
Main Modules:
src/bin/martin.rs- Server entry pointsrc/bin/martin-cp.rs- Bulk tile copying toolsrc/srv/- HTTP service handlersserver.rs- Main server setup and routingtiles/- Tile serving endpointsfonts.rs- Font glyph servingsprites.rs- Sprite servingstyles.rs- Style serving
src/config/- Configuration managementargs/- CLI argument parsingfile/- Config file parsing
martin-ui/- React-based web interface
Data Flow
Key Design Decisions
Note
🧠 This section provides background and context, not required knowledge. You don’t need to understand or remember all of this to use or contribute to Martin. Read it when you’re curious why certain choices were made.
Rust for Performance and Safety
Why Rust: Martin is written in Rust to balance high performance with strong safety guarantees. (click to expand)
- Near-C performance without manual memory management
- Memory safety (no null pointers or buffer overflows)
- Safe concurrency without data races
- Zero-cost abstractions that compile to efficient code
Actix-Web Framework
Why Actix-Web: It offers a fast, production-ready async HTTP stack. (click to expand)
- High-performance async request handling
- Mature middleware ecosystem
- Built-in compression and caching headers
- Easy Prometheus metrics integration
Async/Await Throughout
Why async/await: Allows Martin to handle many concurrent requests efficiently. (click to expand)
- Handles thousands of concurrent connections
- Avoids blocking database queries
- Enables efficient file and network I/O
- Keeps thread usage low under load
Crate Separation
Why multiple crates: The codebase is split into crates with clear responsibilities. (click to expand)
- martin-core — reusable core logic and tile sources
- mbtiles — standalone MBTiles tooling
- martin — HTTP server, configuration, and runtime wiring
- martin-tile-utils — shared low-level tile utilities
This makes it easier to:
- Embed Martin as a library in other Rust projects
- Use MBTiles tools independently
- Maintain clear API boundaries and versioning
PostgreSQL Connection Pooling
Why connection pooling: Reuse database connections instead of reconnecting per request. (click to expand)
- Uses
deadpool-postgres - Avoids per-request connection overhead
- Configurable pool sizing
- Automatic connection health checks
In-Memory Tile Caching
Why caching: Avoid regenerating frequently requested tiles. (click to expand)
- Fast LRU cache with optional TTLs
- Automatic eviction of least-used entries
- Configurable memory limits (default: 512 MB)
- Thread-safe concurrent access
- Significant performance improvements for repeated requests
Automatic Source Discovery
Why auto-discovery: Martin tries to work out of the box with minimal configuration. (click to expand)
It can currently automatically detect:
- PostgreSQL tables with geometry columns
- PostgreSQL functions that return MVT
- MBTiles and PMTiles files in configured directories
This keeps common setups close to zero-config.
Multi-Protocol Tile Support
Why multiple formats: Different workloads benefit from different storage models. This lets operators pick the best format for their use case:
Dynamic tiles generated from live data. Best for frequently changing datasets.
On-the-Fly Resource Generation
Why generate resources dynamically: Sprites, fonts, and styles are created on demand. (click to expand)
- No pre-processing step required
- Simpler deployments (just provide source files)
- URL-based customization
- Less storage overhead
Modular Configuration
Why layered configuration: Martin supports multiple configuration sources. (click to expand)
- CLI flags for quick testing and overrides
- Environment variables for containerized deployments
- Config files for larger or more complex setups
- Clear precedence between configuration layers
Component Interactions
How it works:
- Martin connects to PostgreSQL using connection string
- Queries
geometry_columnsview to discover tables - Queries
pg_procto discover MVT-returning functions - Maintains connection pool for efficient query execution
- Generates tile SQL queries with bbox parameters
- Returns results as MVT tiles
Deployment Patterns
Martin supports multiple deployment patterns:
- Single binary with embedded WebUI
- Direct PostgreSQL connection
- Local file serving
- Suitable for small to medium deployments
Performance Characteristics
- Bottleneck: Complex geometry queries on large tables
- Optimization: Spatial indexes (GIST), connection pooling, query tuning
- Increase CPU for faster tile generation
- Increase memory for larger tile cache
- Faster disk I/O for file sources
- All tile coordinates validated (z/x/y bounds)
- SQL injection prevention through parameterized queries
- Path traversal prevention for file sources
- URL parsing with strict validation
Extensibility Points
Adding New Tile Sources
To add a new tile source type:
- Implement the
Sourcetrait inmartin-core - Add configuration parsing in
martin - Register source in the catalog
- Add integration tests
Example source types that could be added:
- Direct GeoJSON file serving
- Vector tile rendering from raster data
- Integration with other spatial databases
Adding New Resource Types
To add new resource endpoints:
- Implement resource generator in
martin-core - Add HTTP handler in
martin/src/srv/ - Add configuration support
- Update catalog/discovery
Custom Authentication/Authorization
Martin doesn’t include built-in auth, but supports:
- Reverse proxy authentication (recommended)
- Custom Actix-Web middleware
- Token-based access control via proxy
Monitoring and Observability
Martin exposes Prometheus metrics via /_/metrics:
- HTTP request counters and histograms
If you need more in-depth observability, we would be happy to review PRs that add additional metrics; the current implementation is intentionally minimal.
Related Documentation
- Development Guide - Contributing to Martin
- Configuration File - Detailed configuration options
- API Documentation - HTTP API reference
- Sources Documentation - Tile source configuration
Development
docker
Install docker and docker-compose
Tip
Alternative container hosts/runtimes work, but you need to set the
DOCKER_HOSTenvironment variable to let the testcontainers module detect your container. For example, Colima uses a different socket location.
just
Install Just:
cargo install just --locked
just validate-tools  # verify setup
Other Required tools
We provide a simple command to check that all requirements are setup
just validate-tools
Git setup
The recommended setup for both core and casual contributors is to always create a fork
of the primary repo under their own account. The local repo should have two remotes: upstream pointing to the primary maplibre/martin repo, and origin pointing to the user’s own fork. The main branch should track upstream/main, but all new work will be pushed to origin and PRs will be created from there.
Rationale for this setup (click to expand)
This rationale was copied from a post by Yuri
Open source contribution is both a technical and a social phenomenon. Any FOSS project naturally has a “caste system” - a group of contributors with extensive rights vs everyone else. Some of this separation is necessary - core contributors have deeper knowledge of the code, share vision, and trust each other.
Core contributors have one more right that others do not – they can create repository branches. Thus, they can contribute “locally” - by pushing proposed changes to the primary repository’s work branches, and create “local” pull requests inside the same repo. This is different from others, who can contribute only from their own forks.
There is little difference between creating pull requests from one’s own fork and from the primary repo, and there are a few reasons why core contributors should never do it from the primary repo:
- it ensures that casual contributors always run the same CI as core contributors. If contribution process breaks, it will affect everyone, and will get fixed faster.
- it puts everyone on the same leveled playing field, reducing the “caste system” effect, making the project feel more welcoming to new contributors
- it ensures that the primary repo only has maintained branches (e.g.
mainandv1.x), not a bunch of PR branches whose ownership and work status is unclear to everyone
In the martin repository, we follow this and have a branch protection rule that prevents core contributors from creating pull requests from the primary repo.
# clone the primary fork to your local machine, naming the remote "upstream"
# make sure to replace the URL with the correct one
git clone -o upstream https://github.com/maplibre/martin.git
cd martin

# add your own fork as a remote, naming it "origin"
git remote add origin https://github.com/nyurik/martin.git
For further setup instructions for IDEs, please see the Getting Involved step after you have installed the necessary tools below.
If you have already cloned the repo locally, use this guide to update your setup (click to expand)
If you already cloned the repo locally, you can update it to use the new setup. This assumes you have a local clone of the repo, the remote name is origin, and you have already forked the repo on GitHub.
# Getting a quick glance about your remotes: git remote -v
git remote -v
# Rename the existing remote to "upstream". Your "main" branch will now track "upstream/main"
git remote rename origin upstream

# Add your own fork as a remote, naming it "origin" (adjust the URL)
git remote add origin https://github.com/nyurik/martin.git
Contributing New Code
# switch to main branch (tracking upstream/main), and pull the latest changes
git switch main
git fetch upstream

# create a new branch for your work
git switch -c my-new-feature

# edit files, and commit changes
# '-a' will add all modified files
# `-m` allows you to add a short commit message
git commit -a -m "My new feature"

# push the changes to your own fork
# '-u' will track your local branch with the remote
git push -u origin my-new-feature

# Click the link shown by `git push` in the terminal to create a pull request
# from your fork using the GitHub web interface
Tip
When developing MBTiles SQL code, you may need to use
just prepare-sqlitewhenever SQL queries are modified.
Quick Start
# Install tools
cargo install just --locked
just validate-tools

# Start development
just start  # test database
just run    # Martin server
just test   # verify setup
Working with Just
just help        # common commands
just --list      # all commands
just validate-tools  # check setup
Development workflow
just start       # start test database
just run         # start Martin server
just test        # run all tests
just fmt         # format code
just clippy      # lint code
just book        # build documentation
just stop        # stop test database
Testing
Martin’s test suite includes tests that require PostgreSQL to be running and tests that don’t.
# Run tests that don't require PostgreSQL (no external dependencies)
just test-cargo

# Run all tests including PostgreSQL tests (requires PostgreSQL running)
just test     # runs all tests
just test-pg  # starts PostgreSQL and runs only PostgreSQL-requiring tests
The test-pg feature gates tests that require a live PostgreSQL connection.
This allows developers to run most tests locally without setting up PostgreSQL, while CI and integration testing can enable these tests explicitly.
Pass arguments to commands
just test-cargo -- --test integration_test
just run --config /path/to/config.yaml
Getting involved
It’s time to get involved once you have the fork and all required software. This guide covers IDE setup and debugging. While we use Visual Studio Code as an example, Martin can be developed with any editor that supports Rust.
Editor-specific Guides (click to expand)
Visual Studio Code
Install these essential extensions:
- rust-analyzer - Rust language server
- CodeLLDB - Debugger for Rust
- Even Better TOML - TOML syntax highlighting
- GitLens - Git integration (optional)
Vim/Neovim
Use rustaceanvim
Emacs
Use either
RustRover
RustRover supports rust out of the box
Zed
Zed supports rust out of the box
Quick Development Setup
Before diving into IDE configuration, make sure your development environment is ready:
# Validate all required tools are installed
just validate-tools

# Start the development environment
just start  # starts test database
just help   # shows common commands
Debugging with launch.json
Generally, you need to debug martin with specific arguments or a config file to fix issues or add features.
The most convenient way is to generate a launch.json and modify it.
Generate
Press F1 on your keyboard, and input “Generate Launch Configurations from Cargo.toml”. Execute it and save it to your .vscode directory.
Modify
Let’s say you want to debug Martin with this command:
martin postgres://postgres:postgres@localhost:5411/db
You could find Debug executable 'martin' in your launch.json, like below:
{
    "type": "lldb",
    "request": "launch",
    "name": "Debug executable 'martin'",
    "cargo": {
        "args": [
            "build",
            "--bin=martin",
            "--package=martin"
        ],
        "filter": {
            "name": "martin",
            "kind": "bin"
        }
    },
    "args": [],
    "cwd": "${workspaceFolder}"
},
Just copy and paste after it, and modify your pasted like this:
{
    "type": "lldb",
    "request": "launch",
    "name": "my first debug", // name it any as you like
    "cargo": {
        "args": [
            "build",
            "--bin=martin",
            "--package=martin"
        ],
        "filter": {
            "name": "martin",
            "kind": "bin"
        }
    },
    "args": ["postgres://postgres:postgres@localhost:5411/db"], // add your arguments here
     "env": {
         "DEFAULT_SRID": 4490, // add your env here
     },
    "cwd": "${workspaceFolder}"
},
Add a breakpoint
Go to any part you’re interested in of martin code and add a breakpoint.
We add a breakpoint here in the start of martin.
use clap::Parser;
use tracing::{error, info};
use martin::args::{Args, OsEnv};
use martin::srv::new_server;
use martin::{read_config, Config, MartinResult};

const VERSION: &str = env!("CARGO_PKG_VERSION");

async fn start(args: Args) -> MartinResult<()> {
    info!("Starting Martin v{VERSION}");
Debugging
Click Run and Debug on the left panel of Visual Studio Code. Choose my first debug and press F5 on your keyboard.
Wait for the breakpoint to be hit.
Provided Tools
In addition to the martin tile server, we provide a set of tools to help build and manage maps. These tools are designed to work seamlessly with the martin server and can be used to generate tiles, manage data, and perform various operations on maps.
CLI Tools
Martin project contains additional tooling to help manage the data servable with Martin tile server.
martin-cp
martin-cp is a tool for generating tiles in bulk, and save retrieved tiles into a new or an existing MBTiles file. It can be used to generate tiles for a large area or multiple areas.
If multiple areas overlap, it will generate tiles only once.
martin-cp supports the same configuration file and CLI arguments as Martin server, so it can support all sources and even combining sources.
See this article for more information.
mbtiles
mbtiles is a small utility to interact with the *.mbtiles files from the command line.
It allows users to examine, copy, validate or compare and apply diffs between them.
See this article for more information.
Supporting crates
Next to these tools, we also have a set of supporting crates for supporting the martin server and its ecosystem.
Example of this is martin-tile-utils which is used in martin, mbtiles and martin-cp.
Martin as a library
Martin can be used as a standalone server, or as a library in your own Rust application. When used as a library, you can use the following features:
webui- enable web UI- tile sources
mbtiles- enable MBTile tile sourcespmtiles- enable PMTile tile sourcespostgres- enable PostgreSQL/PostGIS tile sources
- supporting resources
fonts- enable font sourcessprites- enable sprite sourcesstyles- enable style sources
lambda- add specialised support for running in serverless functions
If you are missing a part of Martin functionality in the public martin API, we would love to hear from you.
Please open an issue on our GitHub repository or directly open a pull request.